Please note any existing Prescriptions prior to the prescription module update will still show in the old format.
You can create a prescription in the following ways, then begin with step 1 to complete the prescription.
- From a Treatment Note -> select Create Prescription
- From the Patient Record -> select Prescribe
- From the Diary -> select the patient appointment -> select Prescribe
Please note: If you are using the Patient Portal, set the prescription status to Draft while you are completing it. This prevents patients from accessing it before it’s finalised. Leaving the status unspecified means it will be treated as active and visible in the Patient Portal. Also, if you convert a draft prescription into an invoice, it will become active/visible.
If you’re not using the Patient Portal and only emailing prescriptions, you can leave the status as unspecified, Draft, or Active. Keeping a prescription in Draft only affects its visibility in the Patient Portal, it won’t affect your ability to email it or manage it in any way.
Please note: Prescriptions are set by default to expire after 3 months, you can extend this to 6, 9 or 12 months from Business Setup -> Your Clinic -> Consultation.
On this page:
- Create a Prescription
- View Past Prescriptions
- Add / View Attachments
- Share Prescription
- Invoice Prescription
- Dosage variations
- Product Descriptions
Please see the following article to customise fields on the Prescription
Create a Prescription
You can use a Favourite Protocol or Clone an existing prescription, rather than creating one from scratch.
Important: you cannot add PDFs or images directly into the prescription itself. However, you can do the following:
- attach the PDF to the prescription --> select the file to attach from the document library
- insert content blocks of text
insert content blocks that contain images
This article describes how to make content blocks, which you can copy and paste an image into, then use in your prescriptions.
Step 1: Select Status & Branding if applicable. Draft means it is not visible in the Patient Portal. Set to Active when complete, then Preview and Share.
Step 2: Enter Patient Notes -> these notes will show at the top of the patient prescription. Any text added as Heading 1 will show in the same style as the other custom field headings (please see example below in step 7 to Share Prescription).
Step 3: Enter Practitioner Notes -> these notes are private to you and will not show on the patient version of the prescription. These notes will also show on the sidebar when you View Past Prescriptions (see section on View Past Prescriptions).

Step 4: Enter Recommendations and other custom fields -> these notes will show in each section on the patient version of the prescription. These fields can be managed by following this article.

Step 5: Add Supplements, Liquid Herbals and Compounds -> select the Add item button and complete the details. See below for an example of each. See the following articles for more information on Inventory, Liquid Herbals and Compounding.

Search for inventory items from the drop down (items must be added to the inventory first)

Supplements
Select supplements from the drop down (items must be added to the inventory first) -> enter in the dosage and any further notes as below -> select Confirm.
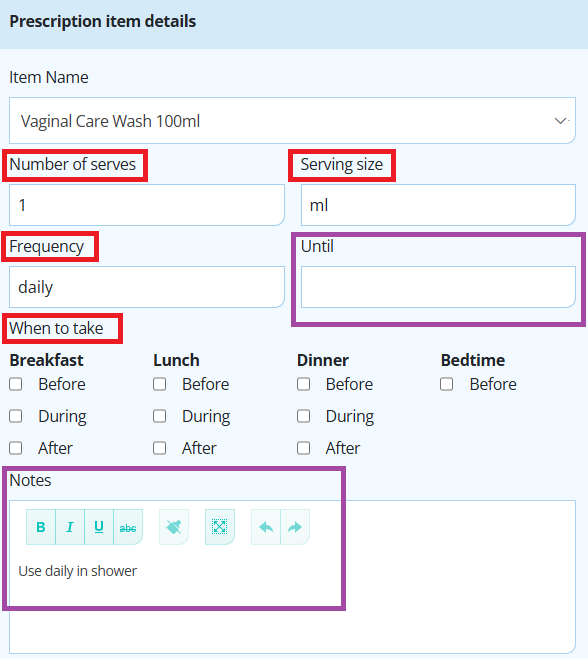
Important Note -> If you do not fill out the 'UNTIL' field then none of the serving information will show under the item on the supplement table. See the below section on 'Dosage Variations'

Liquid Herbals
Select your liquid herbal container from the drop down (items must be added to the inventory first and must be set up as containers) -> enter in the dosage and any further notes -> scroll down to search for and add ingredients as below -> select Confirm.
You will see in the image below the herbal actions will be displayed underneath each herb.
See this article for more detailed steps to add a Liquid Herbal to your prescription.


Compounding
Select your compounding container from the drop down (items must be added to the inventory first and must be set up as containers) -> enter in the dosage and any further notes -> search for and add ingredients as below -> select Confirm.


Once all items are added the list will show as below:

View Past Prescriptions
Step 6: Select Past Prescriptions from the bottom of the screen

This will show a sidebar list of previous prescriptions. You can view the Practitioner notes from this screen or select the Import button to import a previous prescription into the current one. Please note this will override anything already added to the current prescription (as per warning below).


Add / View Attachments
Step 7: Attach documents to your prescriptions -> select the View Attachments button from the bottom of the screen -> use the dropdowns to add attachments:
- Attach Patient File -> from General Files
- Attach Document -> from Document Library
- Attach Video -> from Video Library (inc nat yoga)


Share Prescription
Step 8: To email your Prescription ->select the Share Prescription button -> edit the email subject and body as required -> select Confirm. OR to allow patient access or visibility via the patient portal change status to Active.
Select Preview to view the Prescription before sharing.


Invoice Prescription
Step 9: Invoice from Prescription ->select the Invoice Prescription button at the bottom of the screen to create an invoice with the items added to this prescription. Please see the articles below for more information:

Dosage Variations
Step 10. When the serving options do not suit your supplement, follow the steps below.
The 'Number of serves', 'Serving size' and 'Frequency' are all mandatory fields, however, if the 'Until' field is left blank then none of this information will show on the prescription and the Notes field can be used to provide instructions to the patient, as per the image below. The 'When to take' can be used if appropriate (example 1) or also left blank (example 2).
Example 1
- Enter any data into 'Number of serves', 'Serving size' and 'Frequency'
- Leave 'Until' blank
- Add 'When to take'


Example 2
- Enter any data into 'Number of serves', 'Serving size' and 'Frequency'
- Leave 'Until' blank
- Leave 'When to take' blank

Product Descriptions
Short Product Descriptions can be set to show permanently on prescriptions for any items added manually to the inventory. These are not available for items from Feeds.
To enable or disable these descriptions on the prescription -> go to Business Setup -> Your Clinic -> Consultations -> Patient Prescription Settings -> Show Item Description -> tick or untick -> Save
Step 11. Go to Inventory -> Items -> click on the magnifying glass next to the item -> type in the Short Description -> Save.
If an item does not have a magnifying glass next to it, it is from a Feed and cannot have a Short Description set.

When adding to a prescription, follow the rules above for setting frequency and dosage depending on what you want to show.
In this example, there is no 'when to take' and frequency is set to 'as required' ->

On the patient prescription the above example will show like this below:
- Short Description from inventory item -> Limit these to 4 per day
- Notes from prescription -> For muscle cramps
- Number of Serves, Serving Size, Frequency, Until from prescription -> 1 tablet as required until next appointment
