
The Online Shop allows your clinic to sell selected inventory items online via your clinic portal, giving patients the ability to browse your product catalogue, view product information, add products to a shopping cart, enter their delivery and patient details, and securely complete their purchase through your integrated online payment gateway.
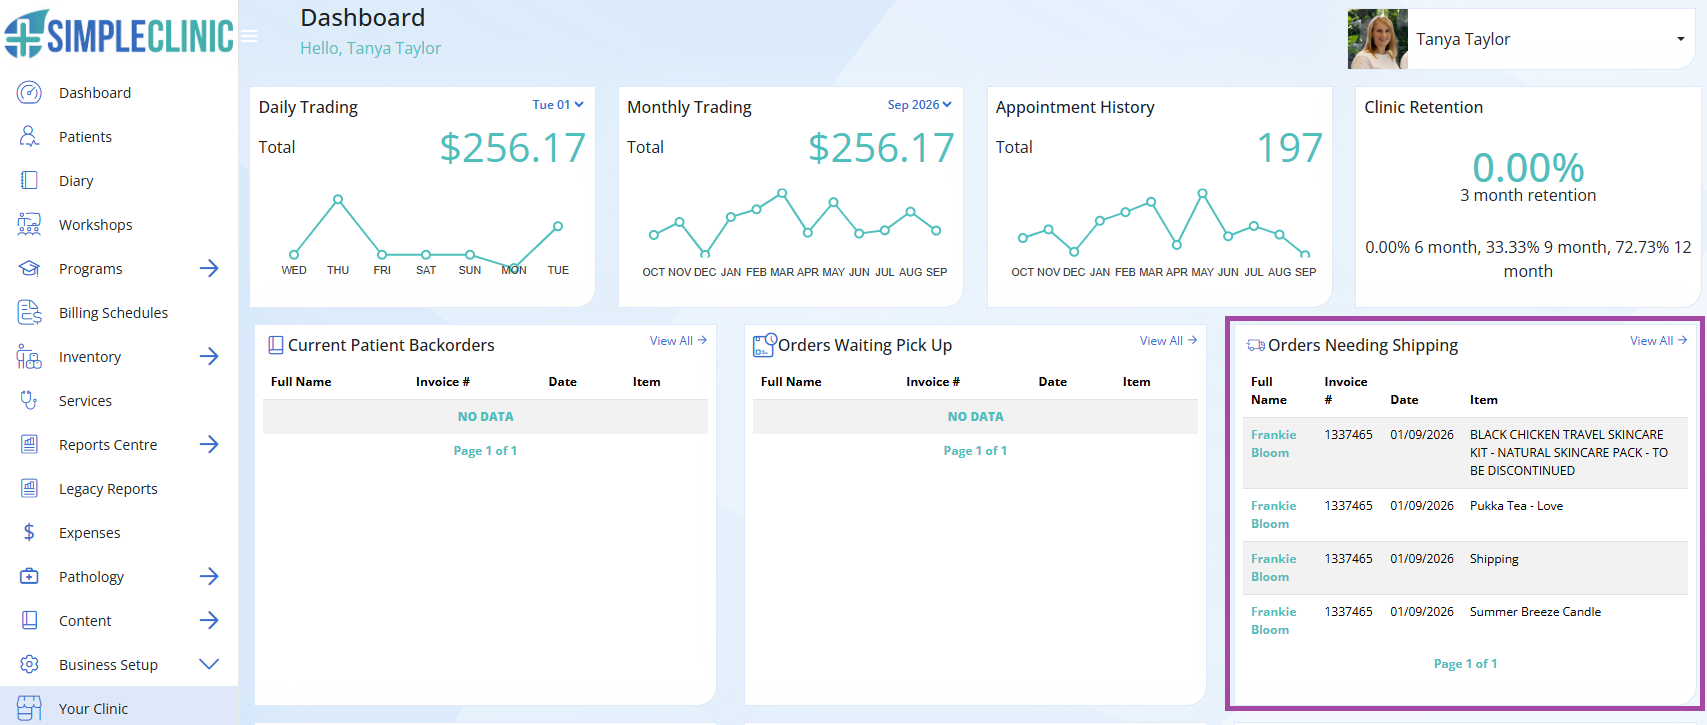
Once an order is successfully completed, an invoice is automatically created for the matched patient with the purchased products and your shipping fee. The invoice will be displayed on your dashboard under 'Orders Needing Shipping', ready for you to action accordingly.
The Online Shop gives you control over which products are available for purchase by using supplier feed inclusion, product whitelisting and product blacklisting rules.
Note: Your clinic is responsible for ensuring that products displayed in the Online Shop comply with applicable TGA requirements and manufacturer guidelines to avoid a TGA fine. If your products do not comply, SimpleClinic has the right to disable your online shop feature.
On this page:
- Important Information
- Helpful Links
- Setting up products to sell in your online shop
- Share your online shop URL
- What happens after a patient orders from your online shop
- Processing your patients online purchase
Important Information
- Your clinic must have the Online Shop feature enabled by the SimpleClinic support team. Email your request to support@simpleclinic.net.
- You must be using the 2023 Inventory User Interface. To check your Inventory UI version go to Business Setup -> Your Clinic -> User Interface Settings -> Ensure you Inventory UI is set to 2023 -> SAVE. Once updated clear your cache.
- You must have a payment gateway integrated with your SimpleClinic account. See here for your payment gateway options.
- If multiple gateways are connected the order of use is Square -> Stripe.
- The online shop uses your clinic's existing pricing rules when determining the price displayed to the patient. If your final shop price is different to the sell price set in your Inventory, check for any pricing rules you may have previously created.
- An online shop order will match an existing patient record based on the email address and birthdate entered at checkout. If there is no match a new patient record will be created. Checkout details do no overwrite the existing patient's stored details.
- Before you can select products for your online shop, the retail product feed must first be enabled for your clinic or you must have added the product to your Inventory.
Helpful Links
- Using pre-loaded supplier feeds
- How to add new inventory items
- Ariya Integration - set up and ordering
Setting up products to sell in your Online Shop
Step 1. Open Shop Configuration
Go to Business Setup -> Portal Configuration
If Shop Configuration is unavailable, confirm that you have emailed support@simpleclinic.net to enable the Online Shop feature for your clinic.
If the feature has recently been enabled, clear your cache to refresh your SimpleClinic update.
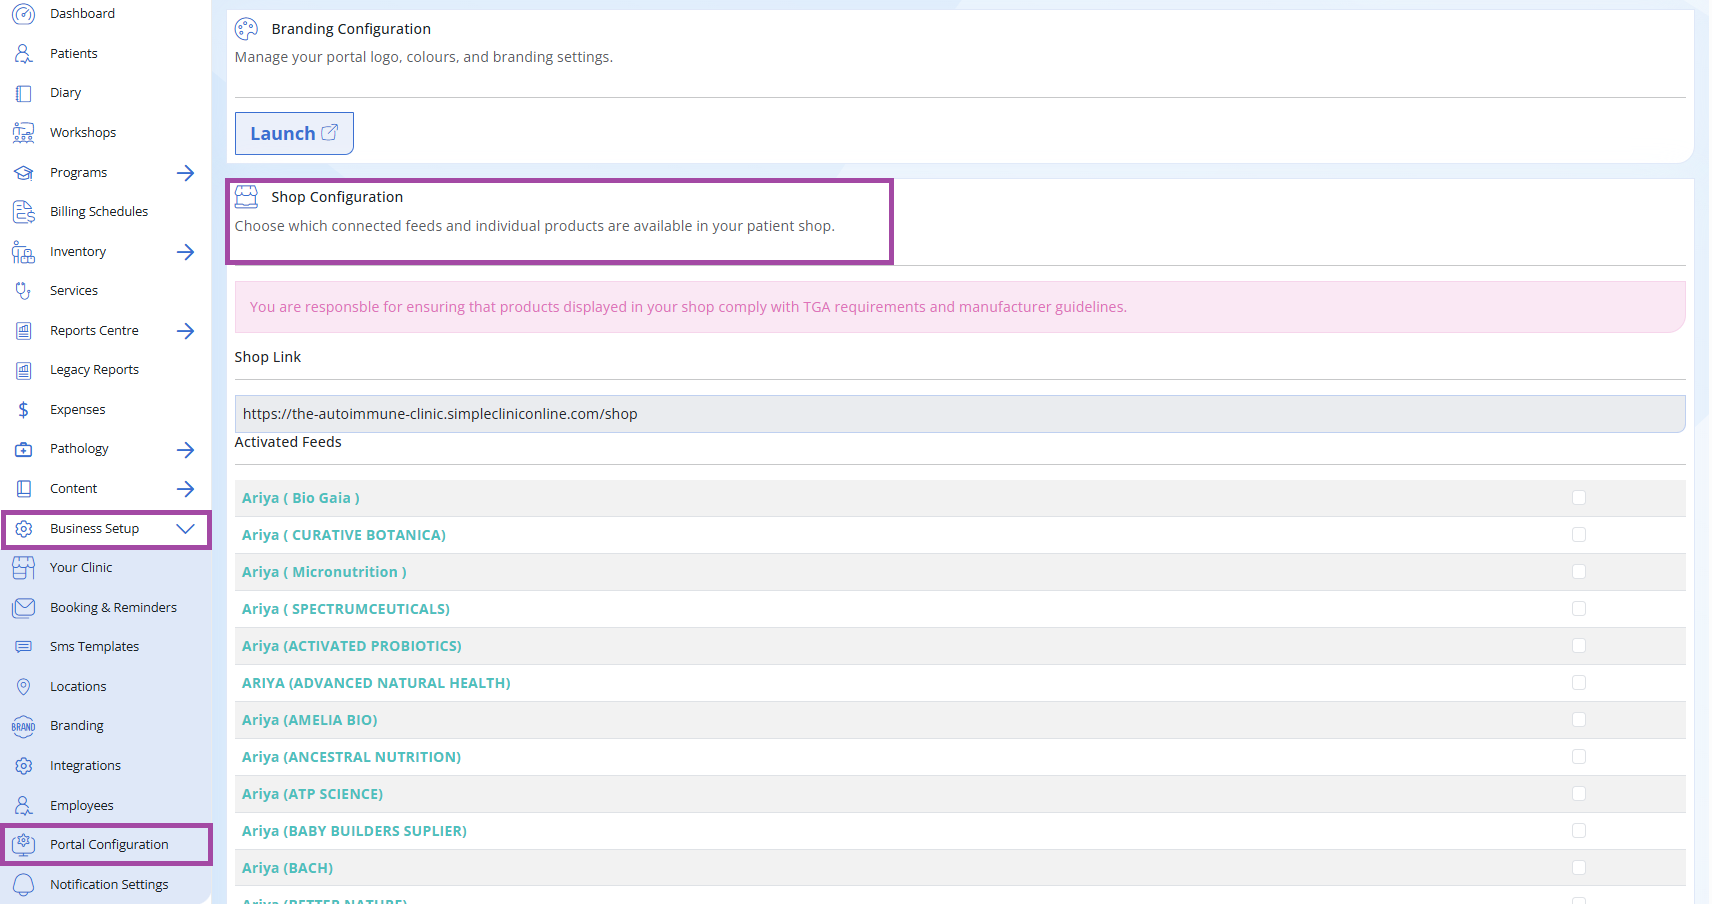
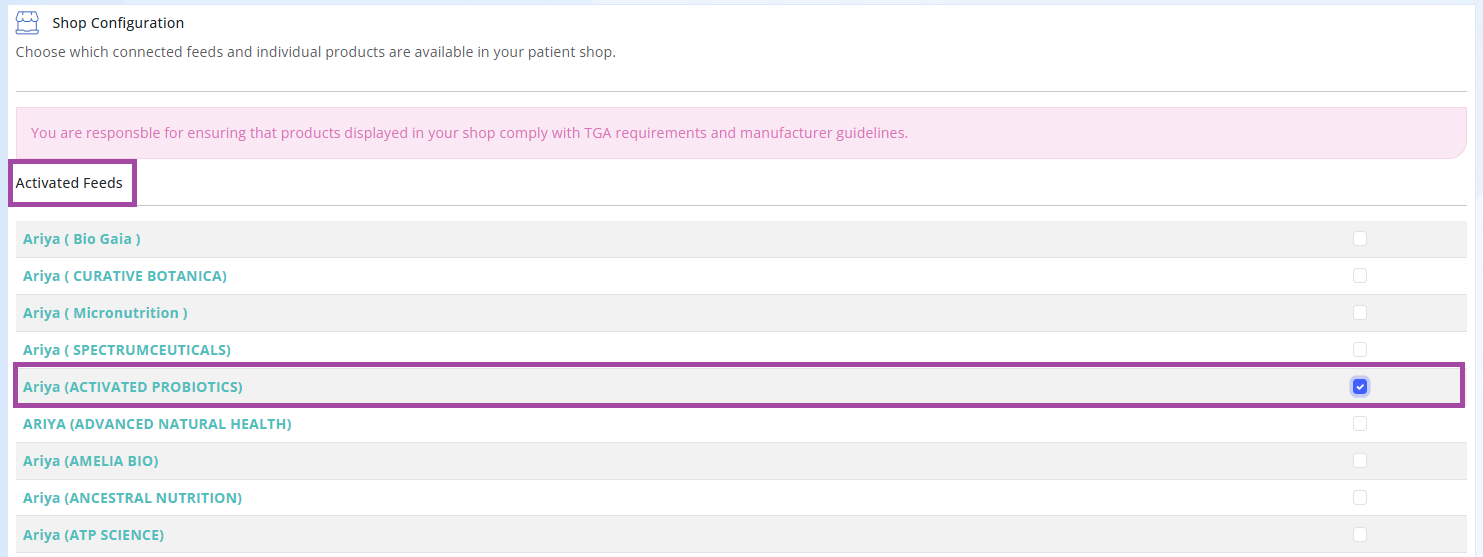
Step 2. Choose which products to publish to your online shop
The Online Shop provides three ways to control which products appear in your catalogue:
Activated Feeds: Selecting a supplier feed creates a rule to add ALL items from that Supplier Feed to your online shop.
Select the tick box next to the enabled supplier feed to add these products to your online shop.
Important Notes about Feeds:
- Unless you wish to sell most or all of a particular supplier feed, it is recommended to individually add the items under your whitelist, rather than switching on the entire feed.
- Only enable feeds containing retail products you want your patients to have access to through your online shop.
- Check the enabled feed for any products flagged as discontinued by the manufacturer and add them to your Blacklist
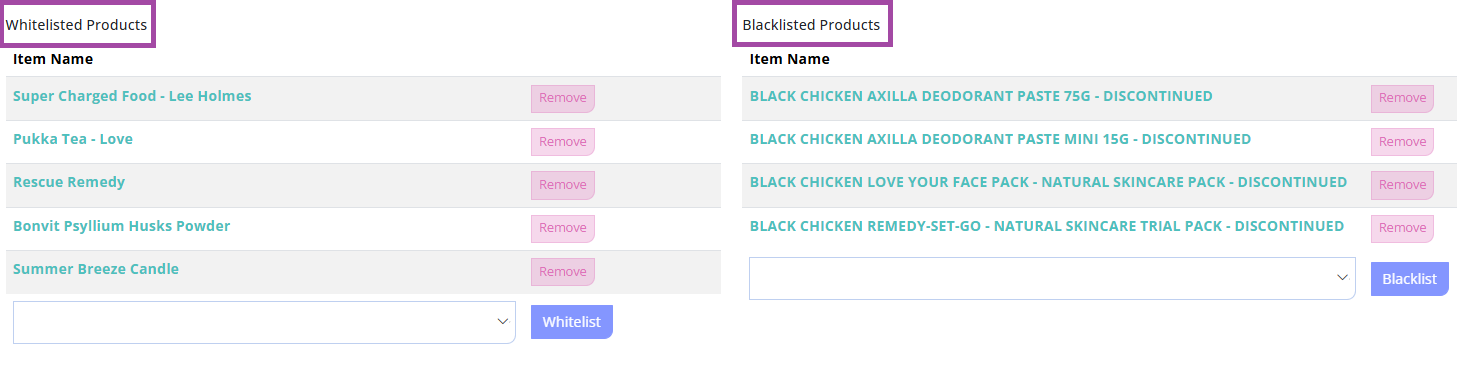
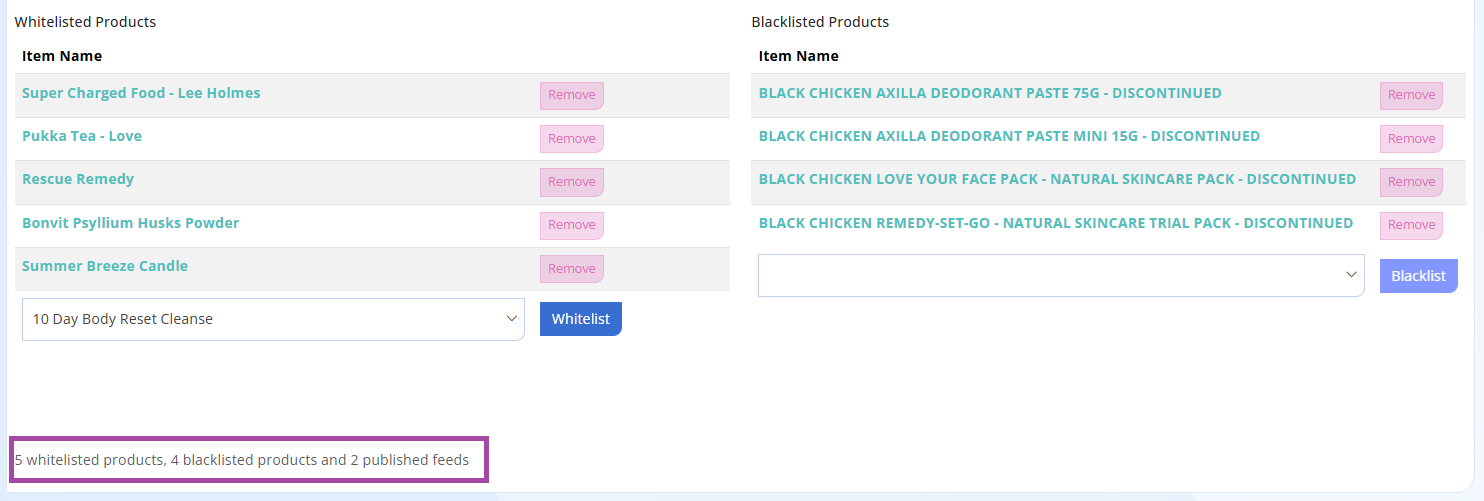
Whitelisted Products: A product can be individually whitelisted (included for sale) by adding it to your Whitelist. This allows you to publish a specific product even when its supplier feed has not been published.
Under Whitelisted Products -> Search for your Inventory item and select the desired product -> Select the Whitelist button to add the product to your whitelist for selling.
Blacklisted Products: A product can be individually blacklisted (excluded for sale) by adding it to your Blacklist. This prevents that product from appearing in your Online Shop, even if it would otherwise be included through an activated supplier feed or whitelist.
Under Blacklisted Products -> Search for the Inventory Item you wish to exclude from your Online Shop -> Select the Blacklist button to add it to your Blacklisted products.
NOTE: Product visibility is controlled by whitelist and blacklist rule. A blacklist always overrides a whitelist/supplier feed rule.
Step 3. Adding an image or short description to your Inventory Item
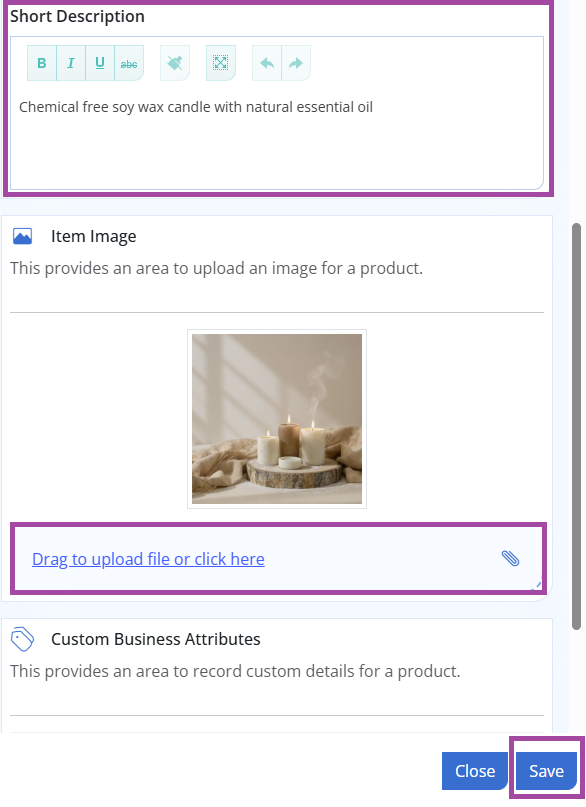
You can display a custom image to your own added retail inventory items.
- Go to Inventory -> Items
- Search for the product -> click item to open the right hand side panel for editing.
- Type a 'Short Description' to be displayed in the online shop.
- Scroll down to 'Item Image'
- Drag your image onto the upload area or select the upload link
- Upload a jpeg or png file. It must be 500 x 500px and no larger than 500KB.
- Wait for the successful upload message in the top right hand corner. The item will automatically saved.
Images can only be uploaded to items that:
- Are added as your own Inventory Item (NOT from a supplier feed)
- Have already been saved to your Inventory
- Are being managed while your online shop is enabled
Note: If an image upload fails, check you are using a simple filename with no symbols and ensure your image is one of the above supported files types and the correct size (500 x 500px and under 500KB).
Step 4. Remove an included product or excluded product rule
To remove an included or excluded product from your online shop:
- Untick the relevant Activated Feeds to remove the supplier feed products
- Select Remove besides a whitelisted product
- Select Remove beside a blacklisted product
Refer to the summary at the bottom of the Shop Configuration screen to see the number of whitelisted, blacklisted and published feeds.
Share your online shop URL
Step 5.
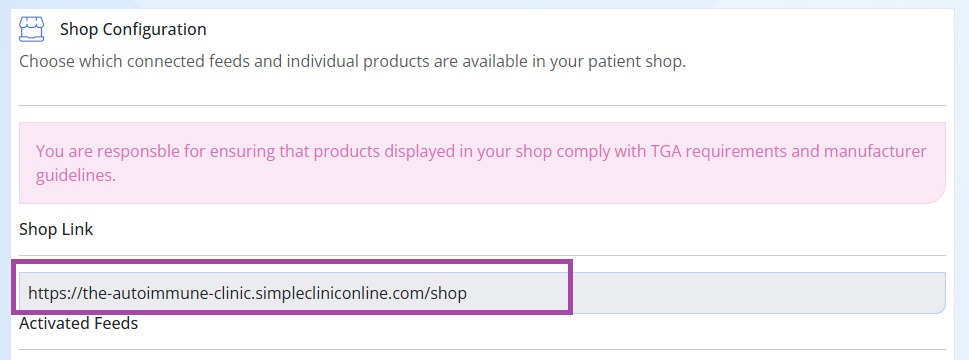
Your Online shop will be displayed under Business Setup -> Portal Configuration -> Under Shop Configuration -> Shop Link.
This link can be added to your website, social media, newsletters etc for patients to access.
What happens after a patient purchases from your online shop?
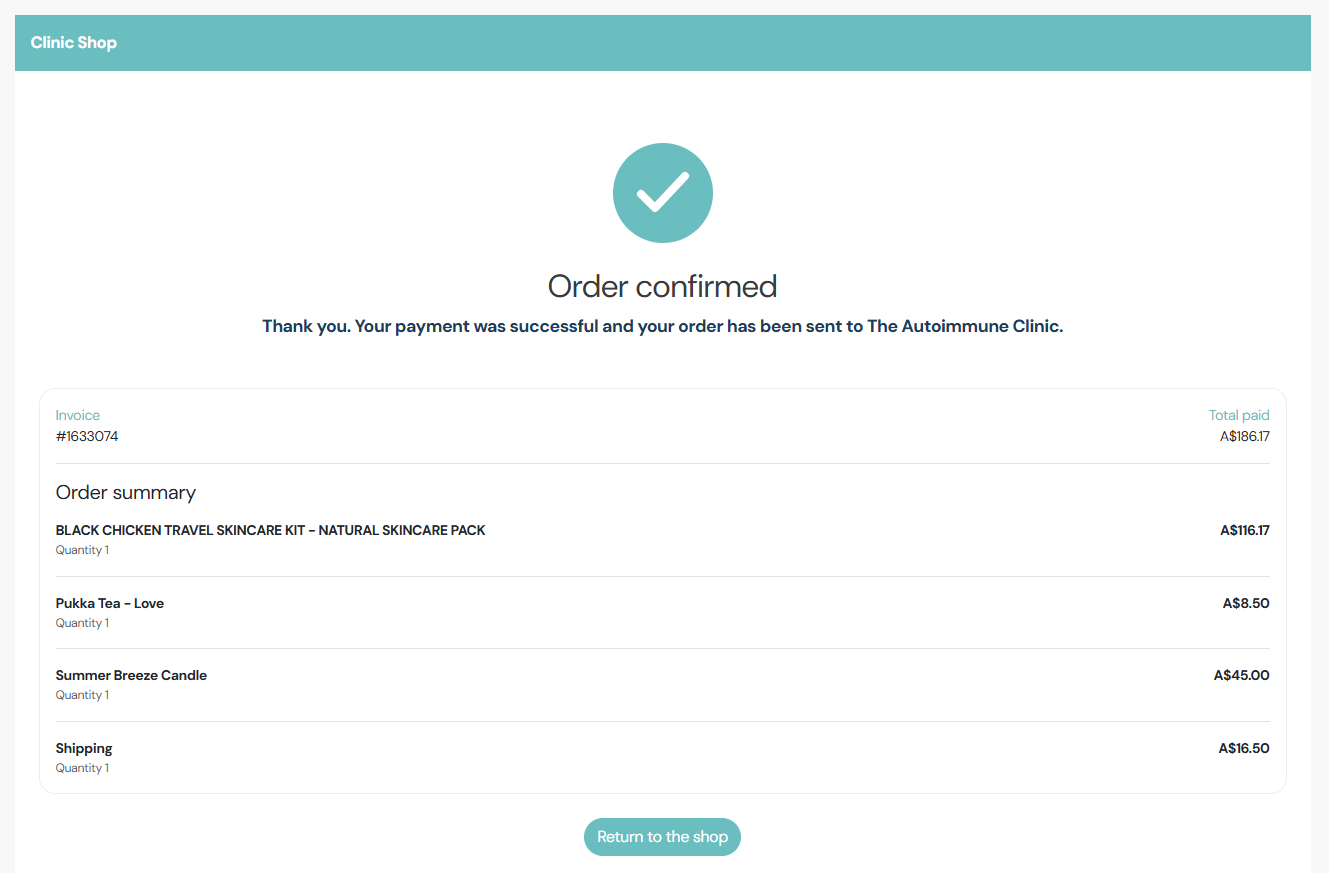
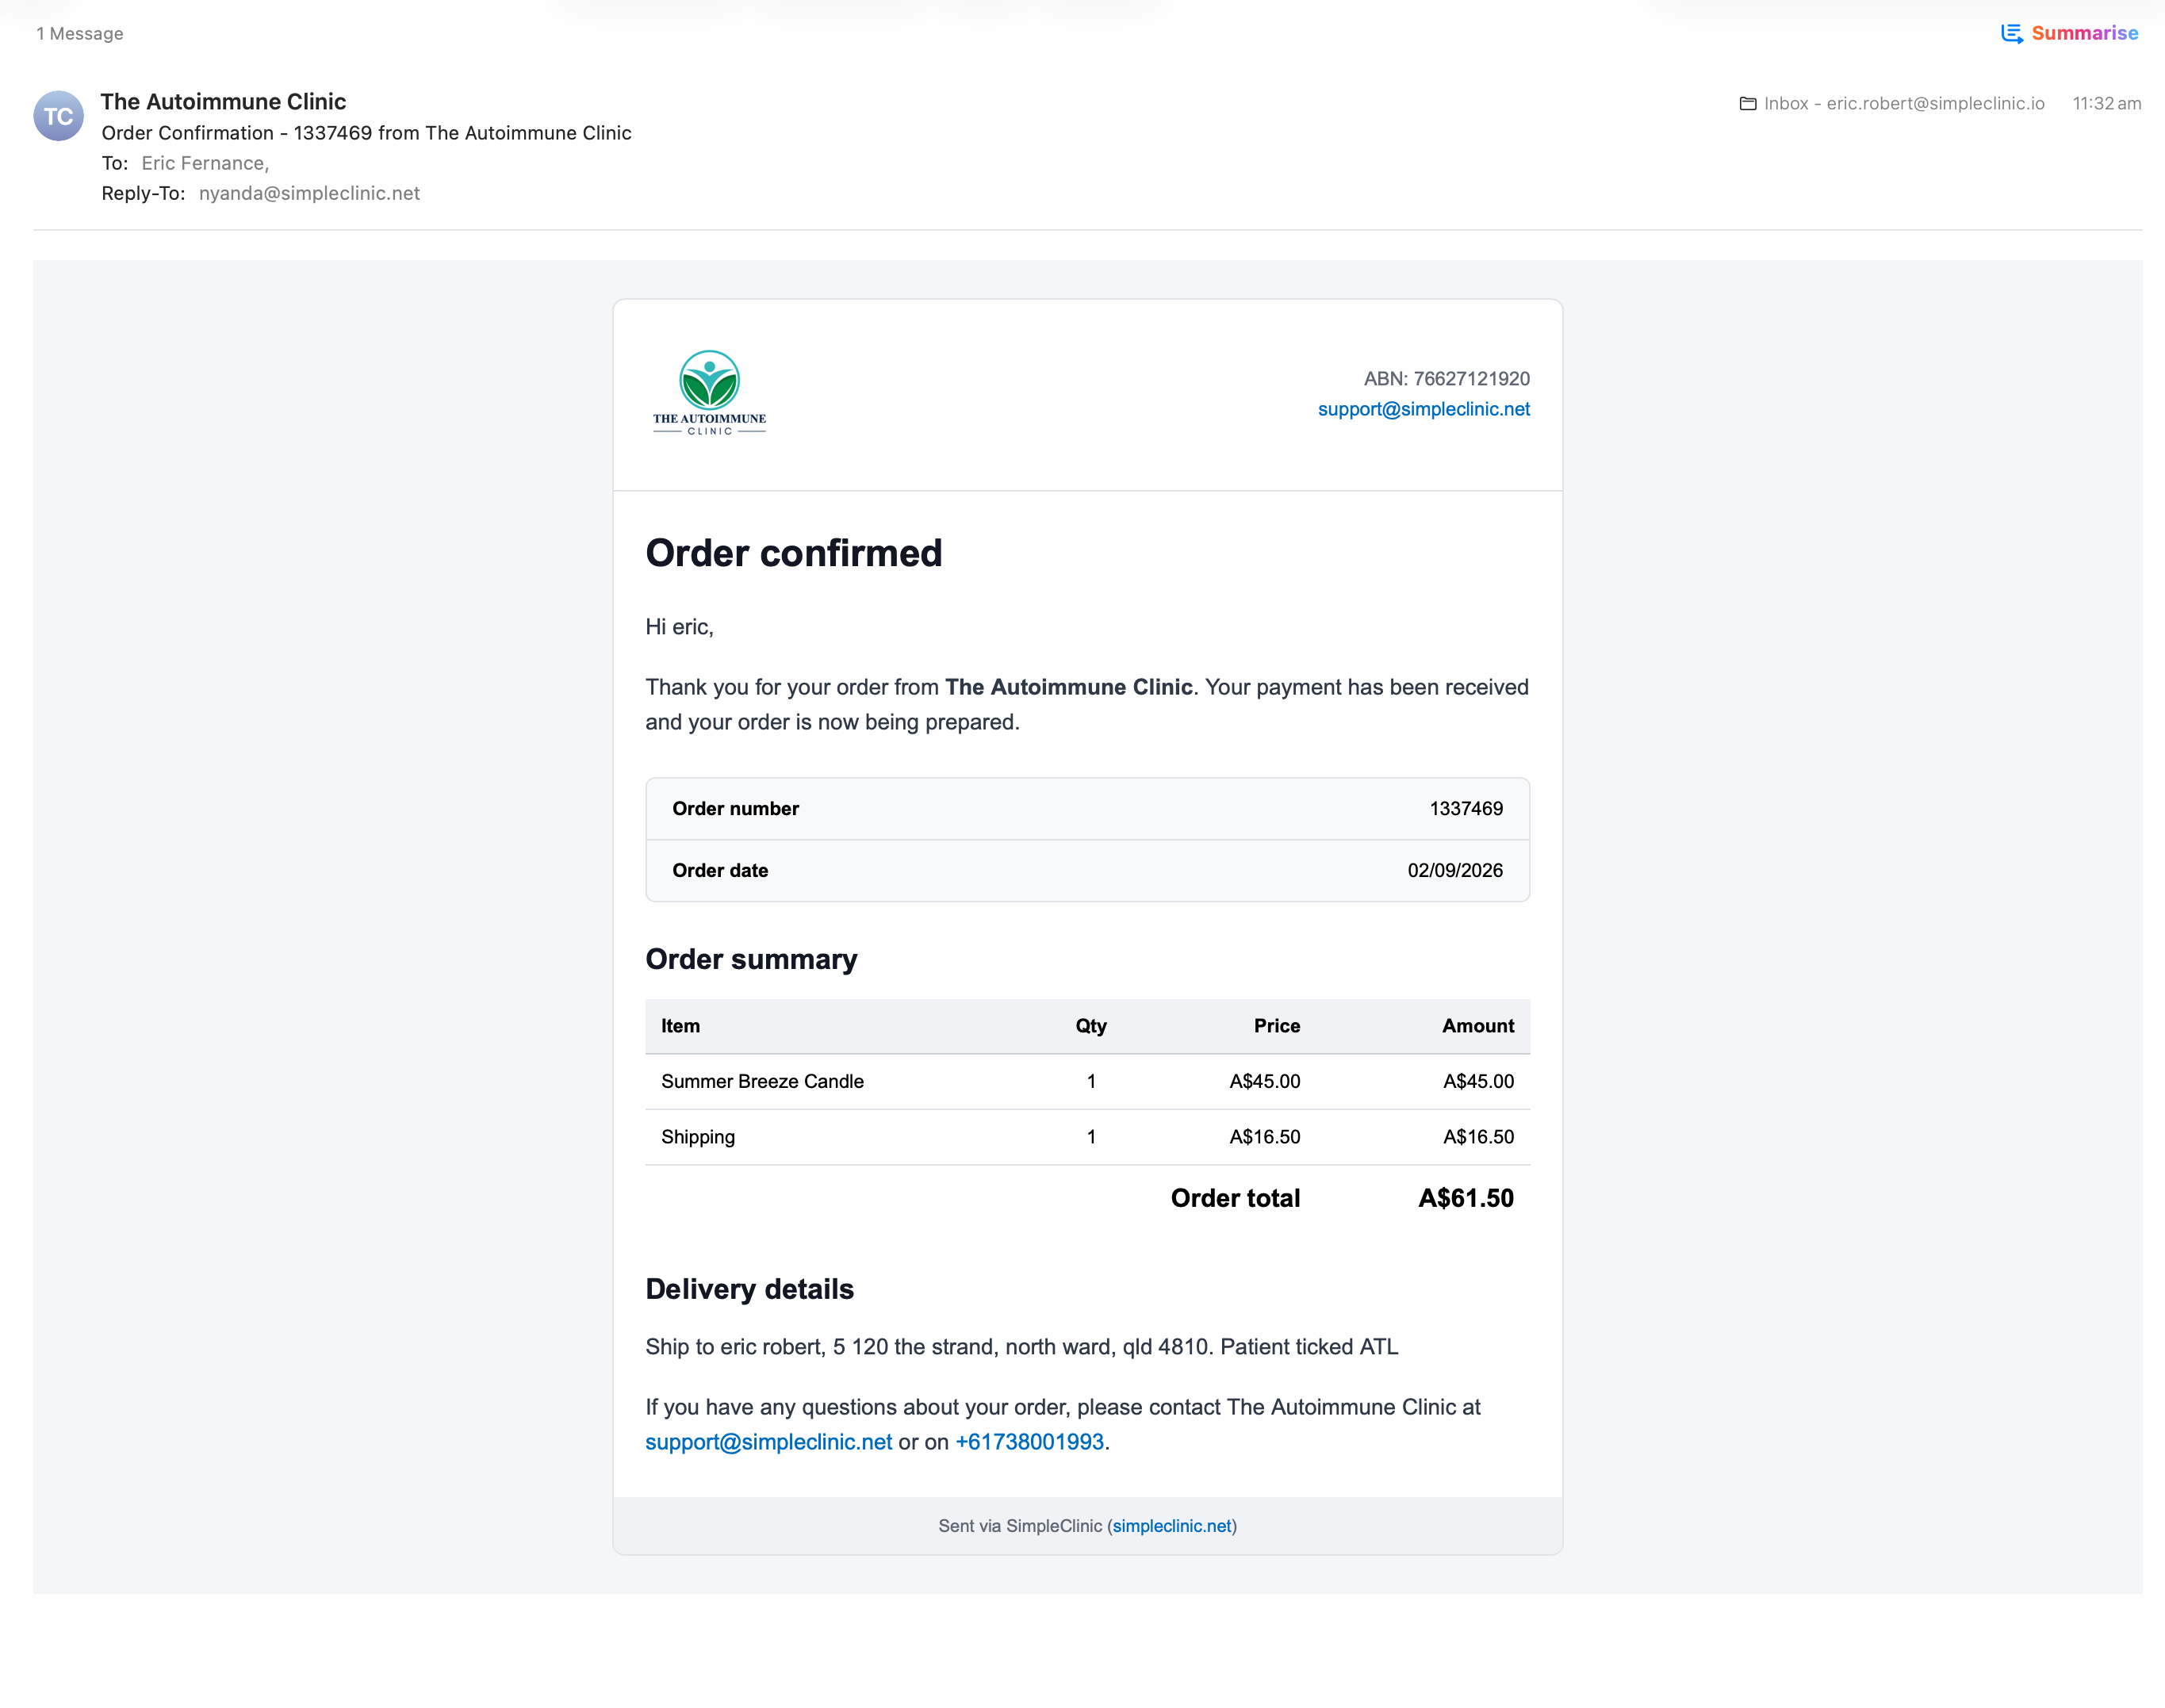
The patient will be taken to an order confirmation screen upon successful completion of their purchase and will receive an email confirmation.
An invoice will be automatically created for the patient's purchase which can be accessed:
- Under 'Orders Needing Shipping' on the Dashboard
- The Patient Record --> Finance tab -> Invoice
Processing your patients online purchase
Step 6.
Click on the order under 'Orders Needing Shipping' to open the invoice and arrange shipping.
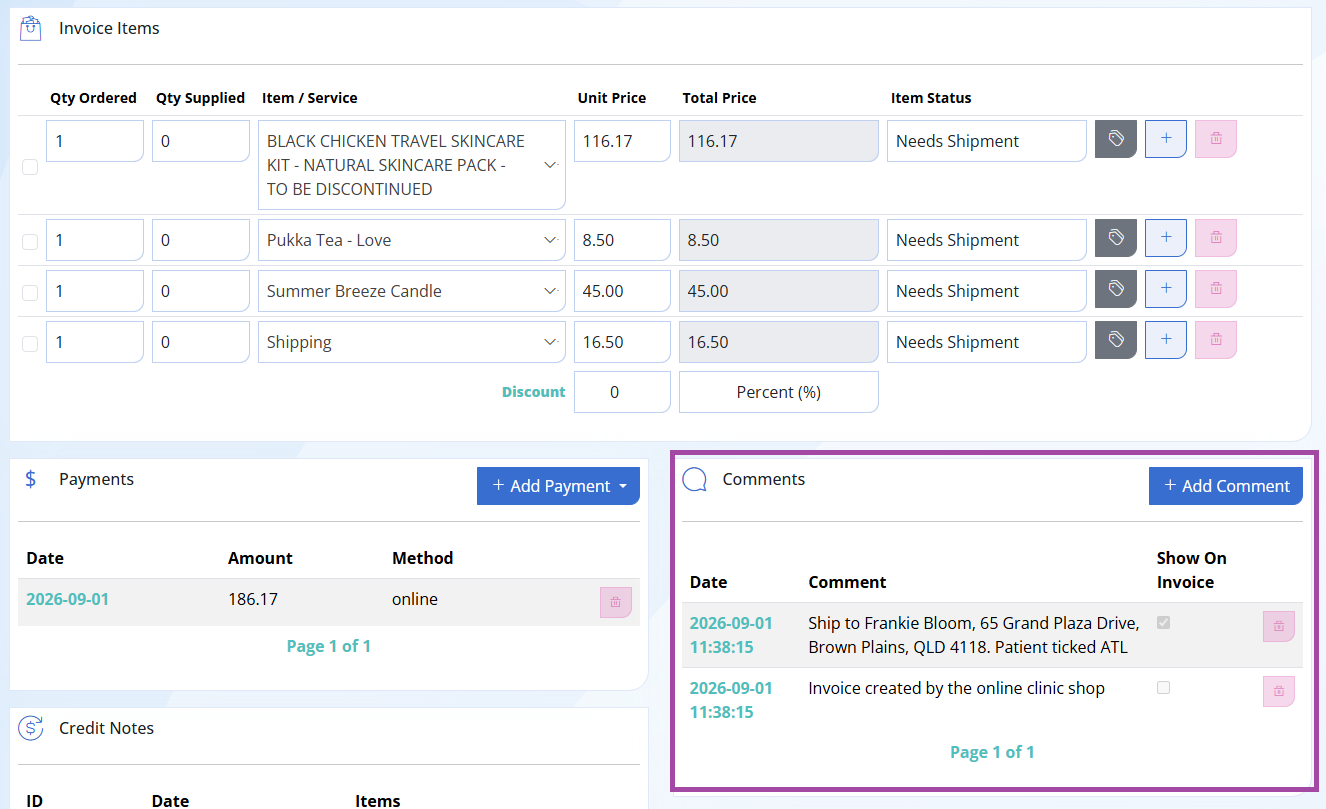
The patients shipping address will be displayed under comments on the invoice. You will also see that the invoice was created by the online clinic shop.
Please note: This address may be different from the one on their patient record.
- If you are drop shipping the Order to be supplied by Ariya you will need to update the Patient address on their Patient Information tab to the delivery address. See here for the steps to send the products using the Ariya Integration.
- If you are shipping the order to the patient via a third party distributor or from your own clinic dispensary / retail stock, ensure you ship the goods to the delivery address provided in the invoice comments.
- If they have selected Authority to Leave then you will also see the note 'Patient ticked ATL' so this can be actioned accordingly.
Important notes:
- If the patient chooses to NOT pay for the products at the checkout page, an outstanding invoice will still be created. You can access this order under 'Orders Needing Shipping' and 'Outstanding Invoices' on your Dashboard. You will need to make contact with the patient regarding their order and taking payment.
- If any products the patient has ordered are on backorder/out stock, you will also need to make contact with the patient to notify them either via phone call, SMS or email.