
Memberships are monthly subscription plans that allow you to give patients access to selected services and optional program enrolments.
A membership plan allows you to:
- Automatically bill the patient monthly
- Issue entitled services after successful payment
- Allow patients to join through a public signup page
- Allow program enrolments alongside service entitlements
On this page:
- Important Information
- Helpful Links
- Create a Membership Plan
- Subscribe patients to your Membership Plan
- Redeeming Membership Plan entitlements
- Provide an Invoice for claiming Private Health Fund
- Cancel a Membership Plan
- Failed Payments Notifications
- Troubleshooting
Important Information
- A Stripe or Square payment gateway needs to be integrated for automatic payments to be made. Click here for more on payment integrations.
- An inventory item first needs to be created to use for membership invoices. See this article to create a new Inventory Item.
- Membership billing is currently only monthly.
- Memberships are not currently available for Tyro payment setups.
Helpful Links
- Payment Integrations
- How to create your inventory item
- If you would like to offer an Online Program with materials and content with your membership click here to create your Program.
Create a Membership Plan
Step 1.
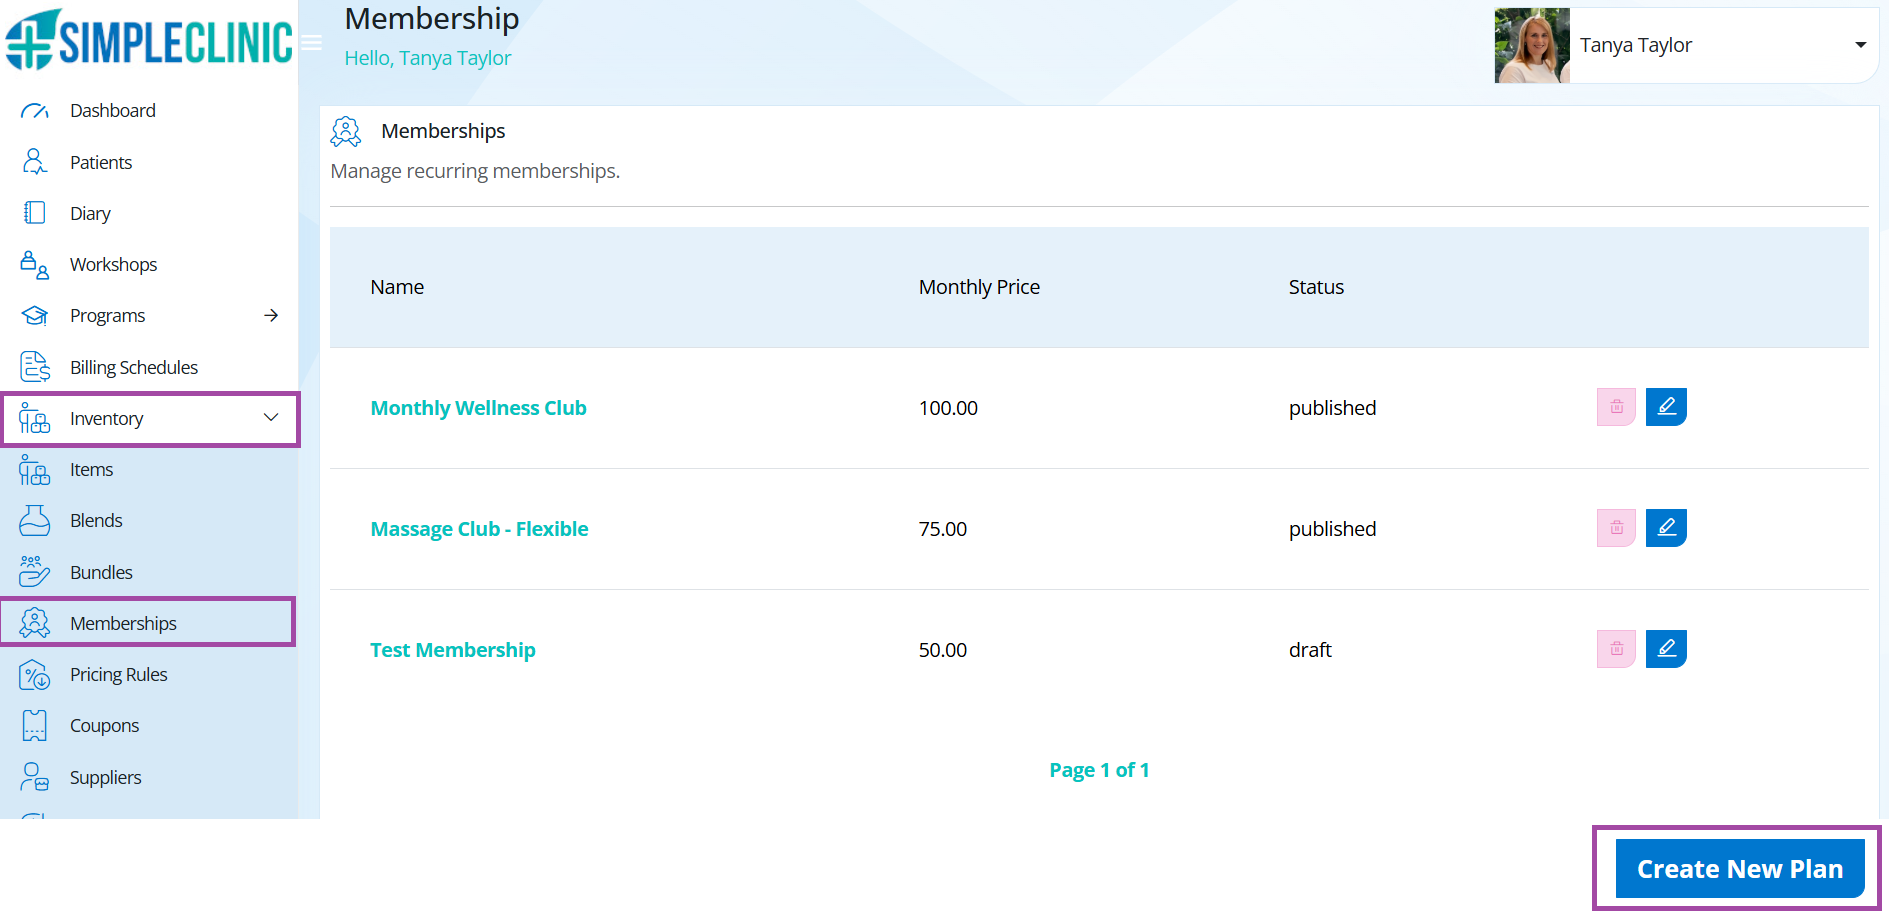
Go to Inventory --> Memberships --> Create New Plan
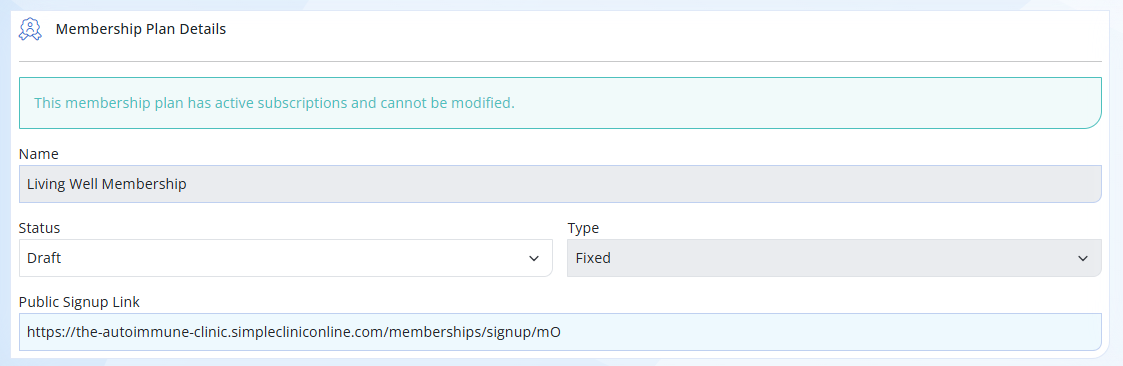
Step 2. Complete the following Membership Plan details
1. Name
Set the name for your Membership Plan
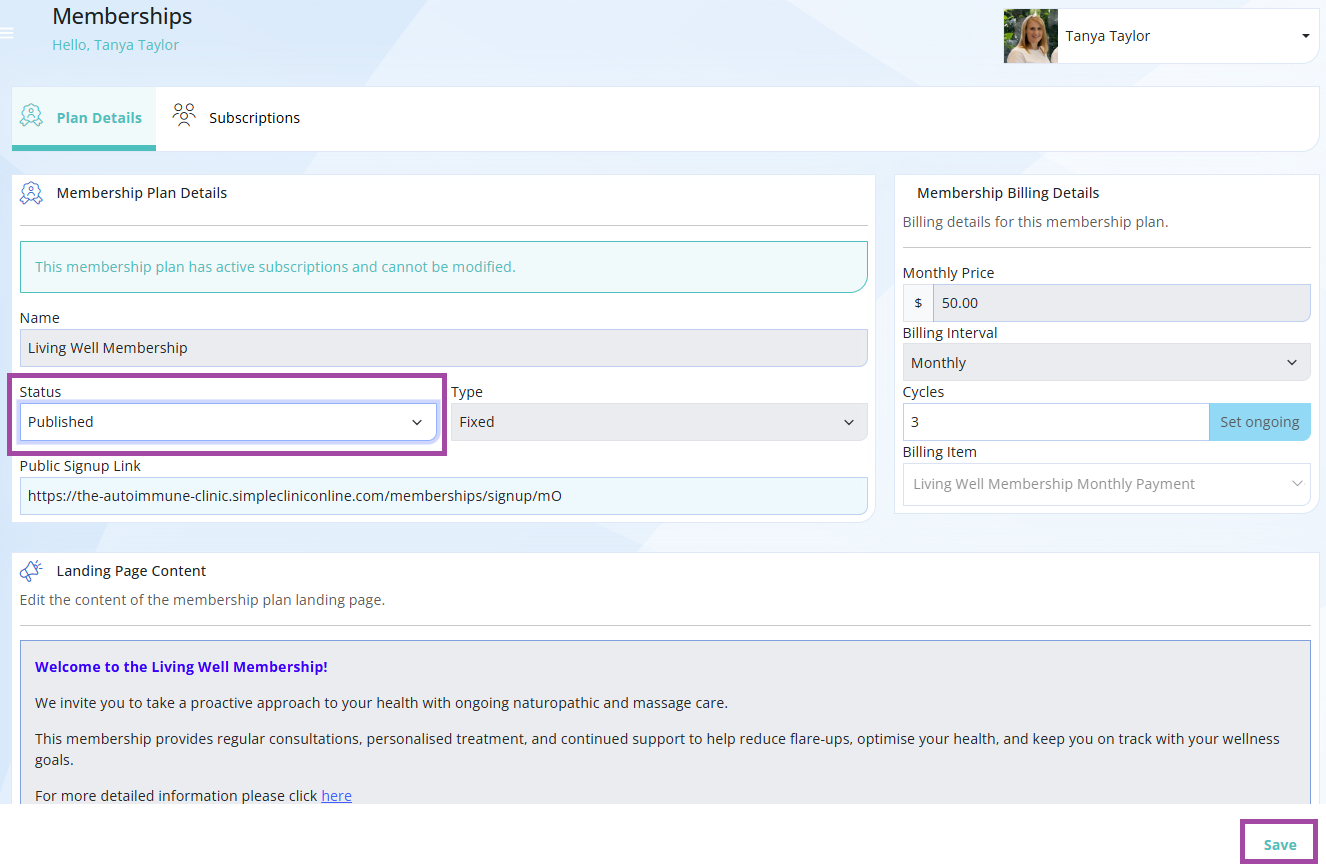
2. Status
Keep your Membership Plan in Draft mode until you have completed all the set up steps and are ready to Launch. When your membership is ready update your plan to 'Published'.
3. Type
Fixed - Use a fixed membership when the patient receives predetermined services in predetermined quantities each billing period.
Example: a patient receives one Follow-up Naturopathic consultation and two Remedial Massage treatments.
Flexible - Use a flexible membership when patients can choose their services from a predefined list each billing period.
Example: The patient can book 1 appointment each month, choosing from Massage, Acupuncture, or a Follow-up Naturopathic Consultation.
4. Public Signup Link
Use this public URL for membership signups. Share it with patients via your website, email blaster, or social media.
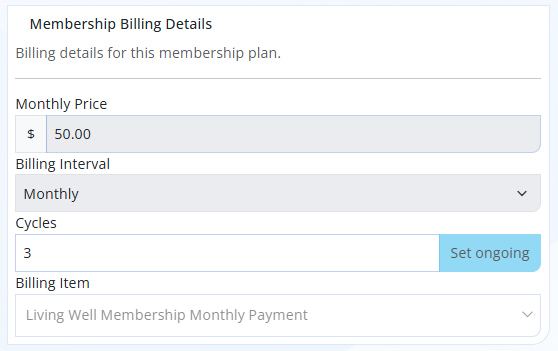
Step 3. Complete the Membership Billing Details
1. Monthly Price
Enter your Monthly billing cycle price
2. Billing Interval
Enter the Billing Interval. Please note this is currently limited to Monthly only. Other options will be available in future updates.
3. Cycles
Choose how long the membership will bill for.
- Ongoing until cancelled will create a recurring billing schedule with no end date.
- Set max instances will create a billing schedule with a set number of billing cycles. The example below has 3 x Billing cycles.
4. Billing Item
Select the billing item from your Inventory. This is the inventory item that will be charged each billing cycle. Ensure you've already created an inventory item for each membership fee under Inventory → Items.
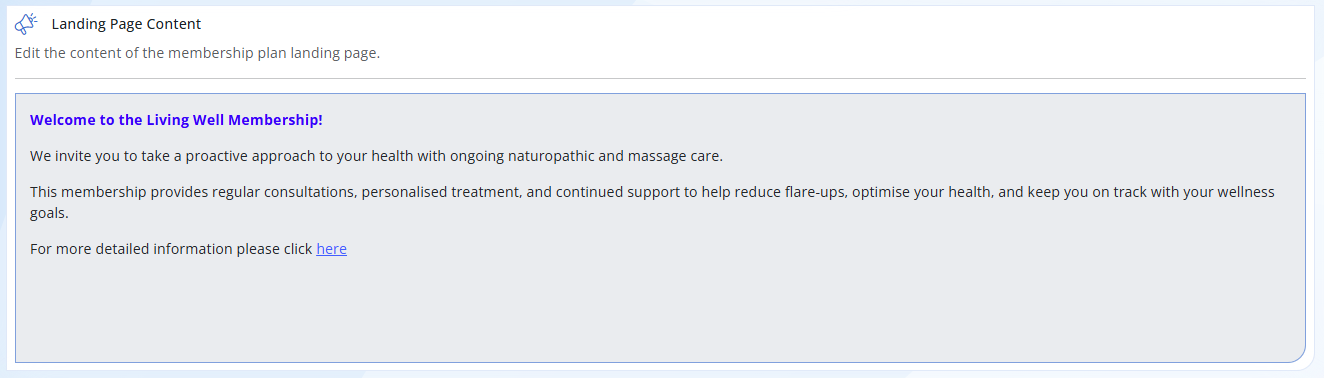
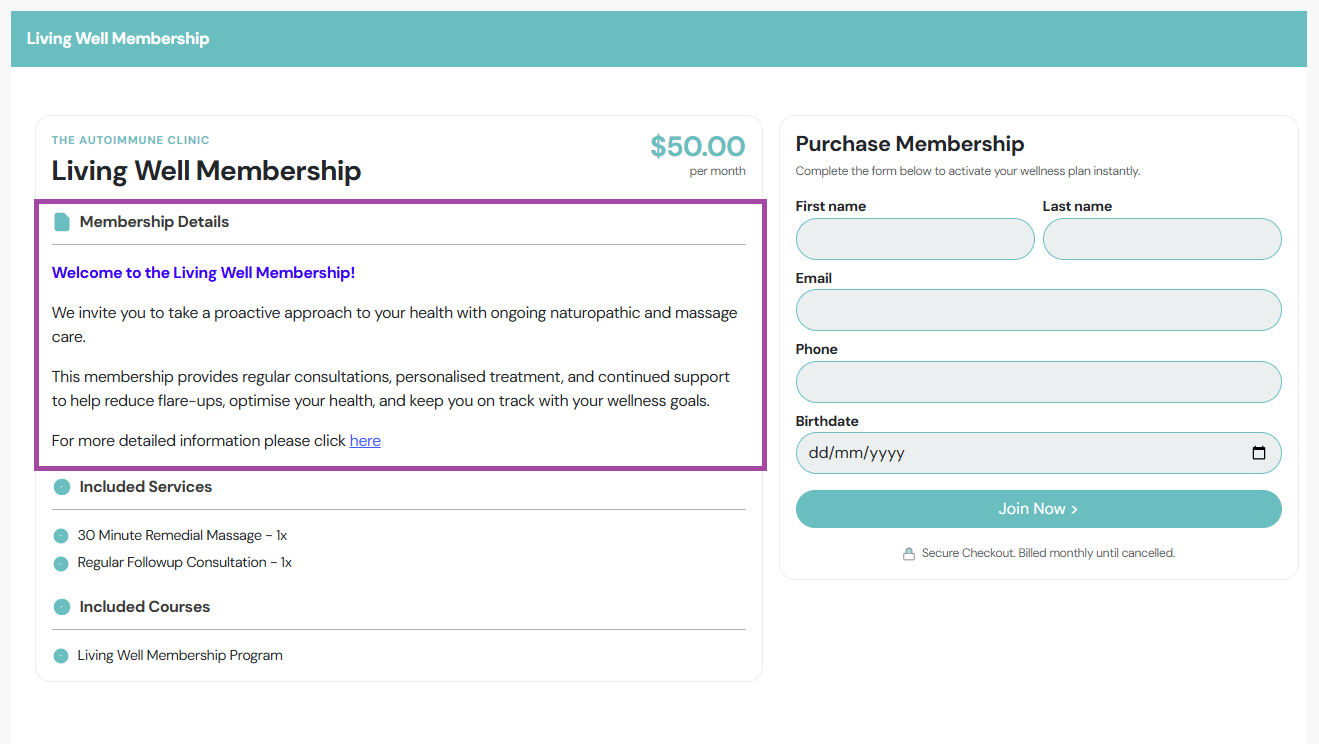
Step 4. Add your Landing Page Content
Add the details of your Membership Plan. This will display under the title of your plan on the public URL landing page.
Keep this description brief and focused. Avoid repeating information that's already displayed elsewhere, such as the membership entitlements and pricing.
Tip: Use the formatting tools with the Landing Page Content Field to edit and customise your text. You can change the font size and colour, add images and hyperlinks for more detailed information.
Please note if pasting information from another source (e.g. word docs / websites), ensure to use the steps below to avoid carrying over any background coding and formatting.
Right-click on the text you want to copy → Select "Copy" --> In SimpleClinic, right-click where you want to paste → Select "Paste as plain text"
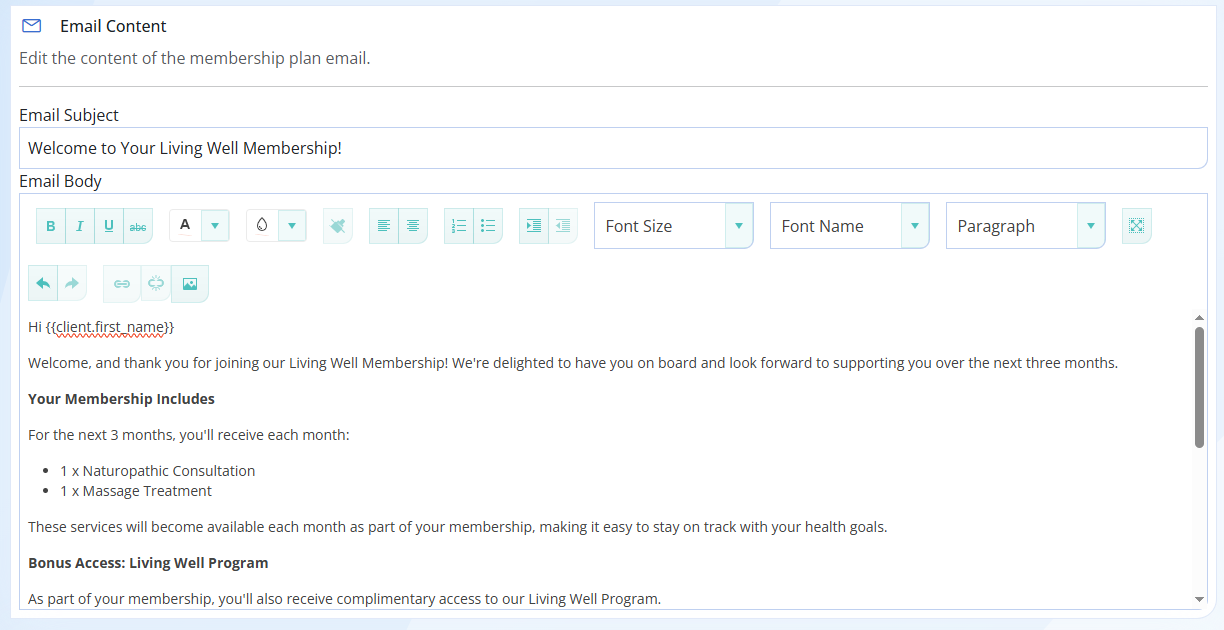
Step 5. Add your Membership Plan confirmation email
The Membership Plan confirmation email will be sent out automatically once the Membership subscription is confirmed.
Your email should include:
- An Email Subject line and an Email Body.
- What the Membership includes (Service entitlements / Program enrollments)
- Use supported merge tags to personalise your email, such as the client name merge tag e.g. {{client.first_name}}
- Add your online booking URL so your patient can easily book their entitled services. Email support@simpleclinic.net to create any custom booking urls for your individual services.
- If you're offering a Program, remind them to look out for their Program Enrollment email with instructions to access their Program content via the Patient Portal.
See the example Membership confirmation email below
Subject line: Welcome to Your Living Well Membership!
Email Body:
Hi {{client.first_name}}
Welcome, and thank you for joining our Living Well Membership! We're delighted to have you on board and look forward to supporting you over the next three months.
Your Membership Includes
For the next 3 months, you'll receive each month:
- 1 x Naturopathic Consultation
- 1 x Massage Treatment
These services will become available each month as part of your membership, making it easy to stay on track with your health goals.
Bonus Access: Living Well Program
As part of your membership, you'll also receive complimentary access to our Living Well Program.
Keep an eye on your inbox for a separate Program Enrolment email. This email will contain everything you need to access your program through the Patient Portal.
You can log in to the Patient Portal here:
https://patient.simpleclinic.net
Booking Your Appointments
When you're ready, simply book your appointments using the online booking link below. As an active member, your included monthly naturopathic consultation and massage treatment will automatically be redeemed during the booking process, so you won't be prompted for payment.
If you have any questions about your membership or need assistance getting started, please don't hesitate to get in touch. We're here to help and look forward to supporting you on your wellness journey.
Warm regards,
The Autoimmune Clinic Team
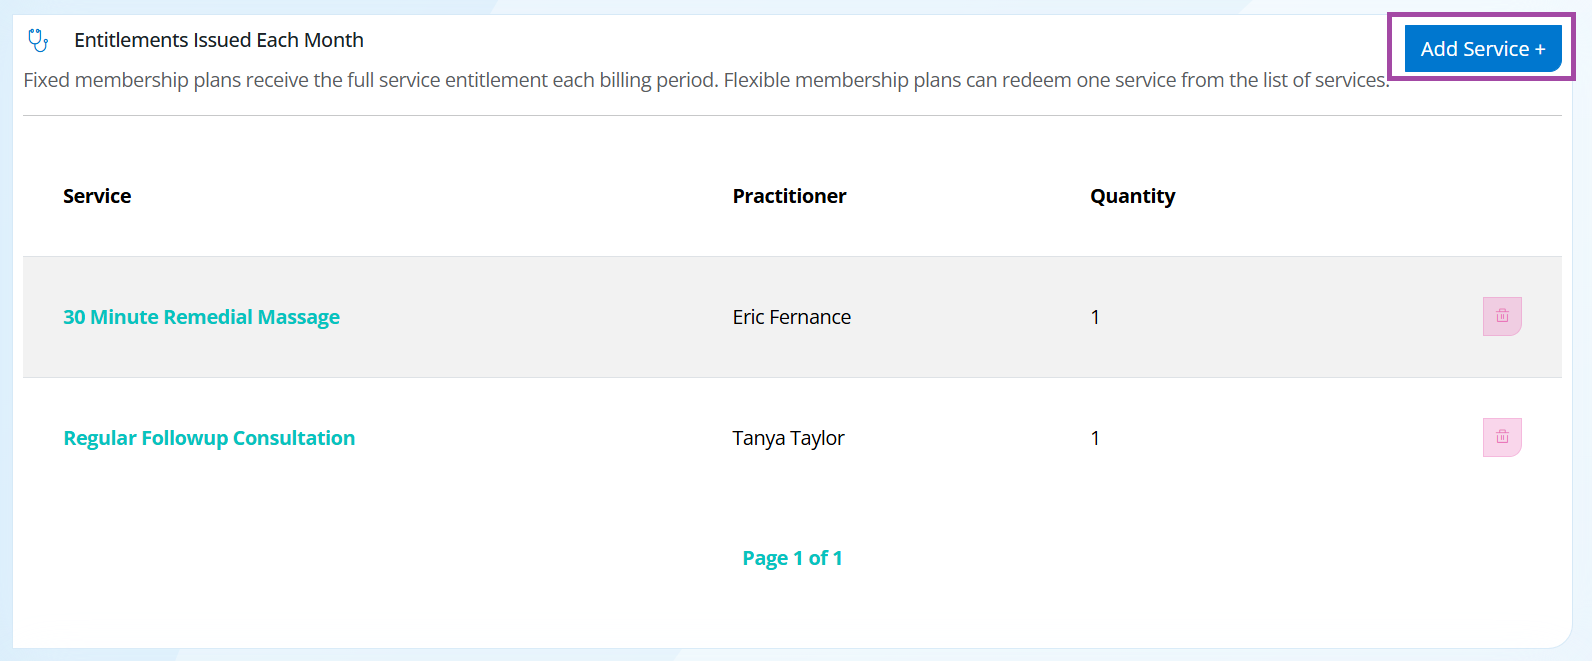
Step 6. Add the monthly entitled services to the plan
Select Add Service + --> Choose the service from the drop-down list --> Enter the quantity available each monthly billing period --> SAVE.
Reminder
- Fixed memberships provide a set quantity of specific services each billing cycle. e.g. 2 x Massage treatments and 1 x Naturopathic consultation per month.
- Flexible memberships allow patients to redeem one service per billing cycle from a list of eligible services. E.g. Choose one appointment per month from a range of Massage / acupuncture or Naturopathic services.
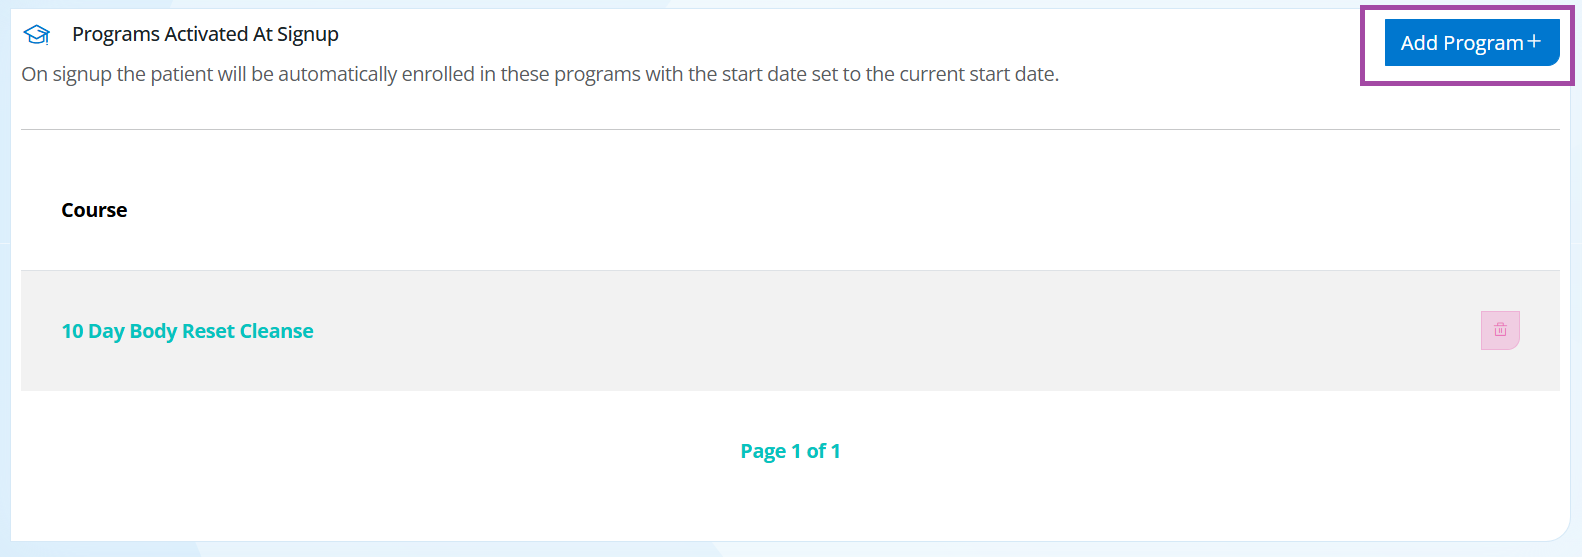
Step 7. Add any programs included in your Membership Plan (optional)
Select Add Program + --> Choose your program from the drop-down list --> SAVE
Please note: The patient will be enrolled in the program on their first scheduled billing date. This is when they'll receive their program enrolment email and gain access to the program in the Patient Portal, subject to your program's lesson availability schedule.
Step 8. Publish and Save your Membership Plan
If all membership details are complete, update your membership plan to 'Published' and select SAVE from the bottom right hand corner.
Subscribe patients into your Membership Plan
Step 9.
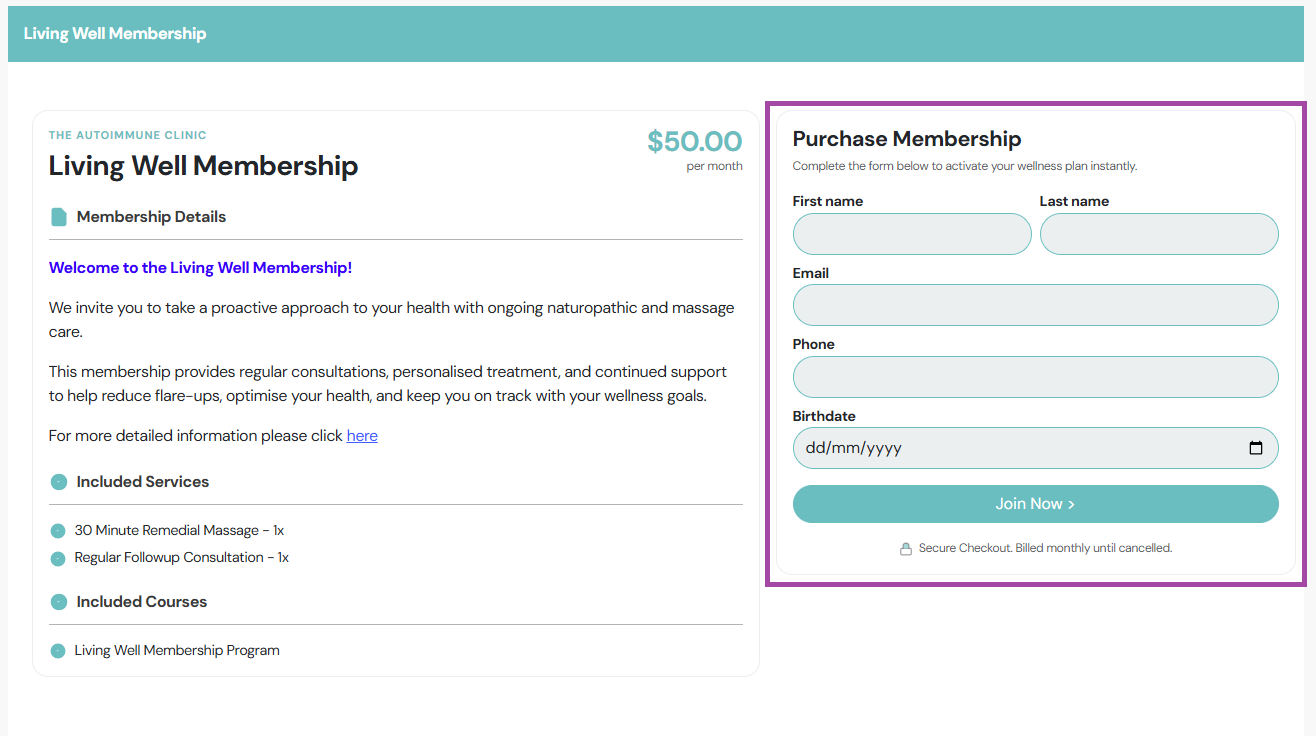
Share your Public Signup Link with your patients on your website, social media or an email blaster.
The patient will need to enter their First name, Last name, email, phone and birthdate --> then select Join Now.
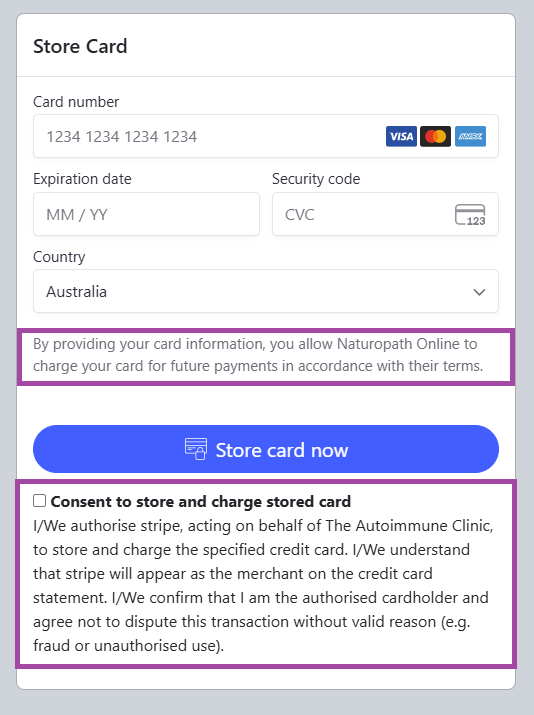
The patient will be directed to enter and save their credit card details via your online payment gateway. This step also confirms their consent for future payments to be deducted.
This will automatically store your patients card details against their patient record --> Finance tab and the Billing schedule will be automatically updated to ACTIVE.
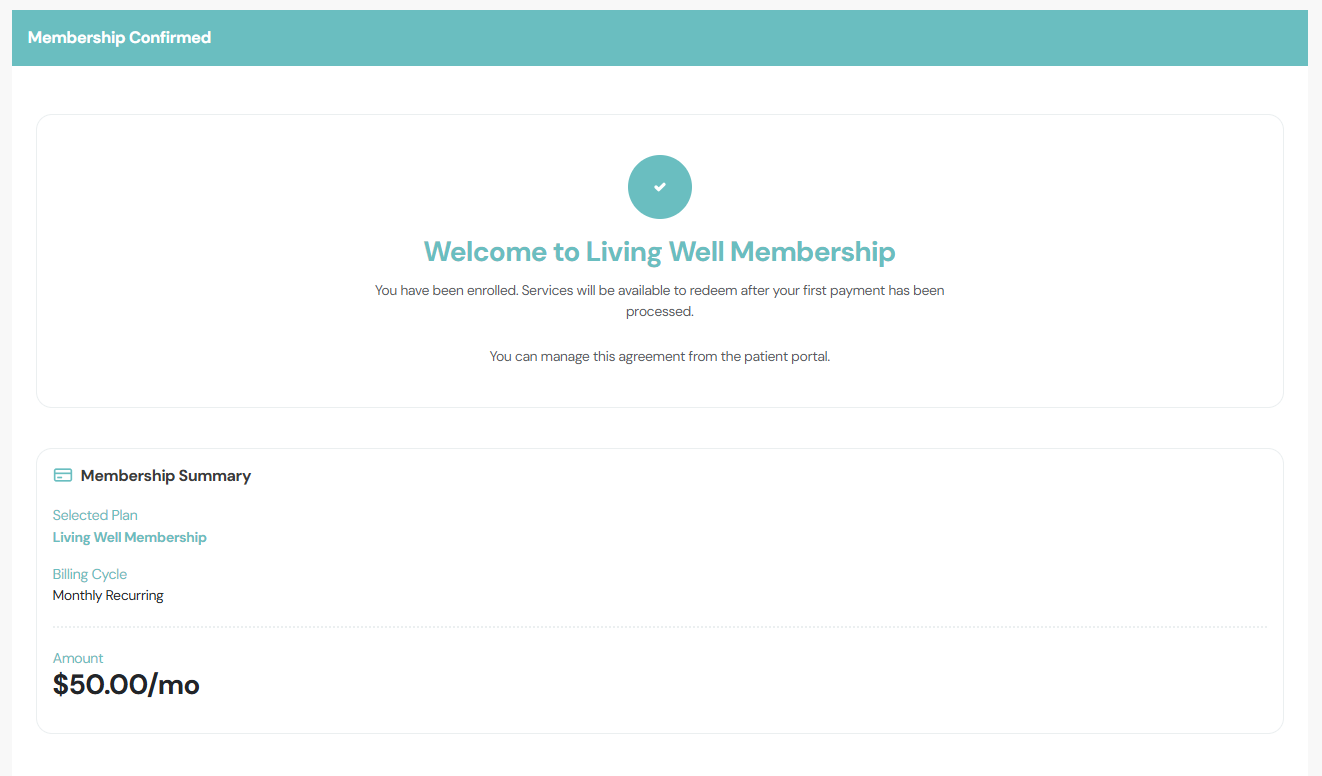
The patient will then be provided a Membership confirmation on their screen and your Membership confirmation email will be automatically sent.
Once Subscribed the following will occur:
Payment Information
- The Patient credit card details are saved within your payment gateway for future payments to be deducted. View this under the patient record --> Finances tab --> Payment Details.
- A Billing Schedule will be created automatically and set as ACTIVE. View this under Billing Schedules in the Main Menu.
- The first subscription invoice will be created and payment will be taken (allow up to 15 minutes for this to occur). This can be viewed under the patient record --> Finances tab, or under Inventory --> Billing Schedules --> View the schedule and scroll down to view 'Past Invoices'.
Service Entitlements
- Once the first payment has occurred the patients entitled services will be available under the patient record --> Finances tab --> Entitlements.
Program Enrolments
- If you are offering a Program enrollment with your membership, once the first payment has been processed enrollment will be activated and the Program enrollment email will be sent to the patient. View the enrollment email sent to the patient under the patient record --> Messages tab.
Redeeming Membership Plan Entitlements
Step 10.
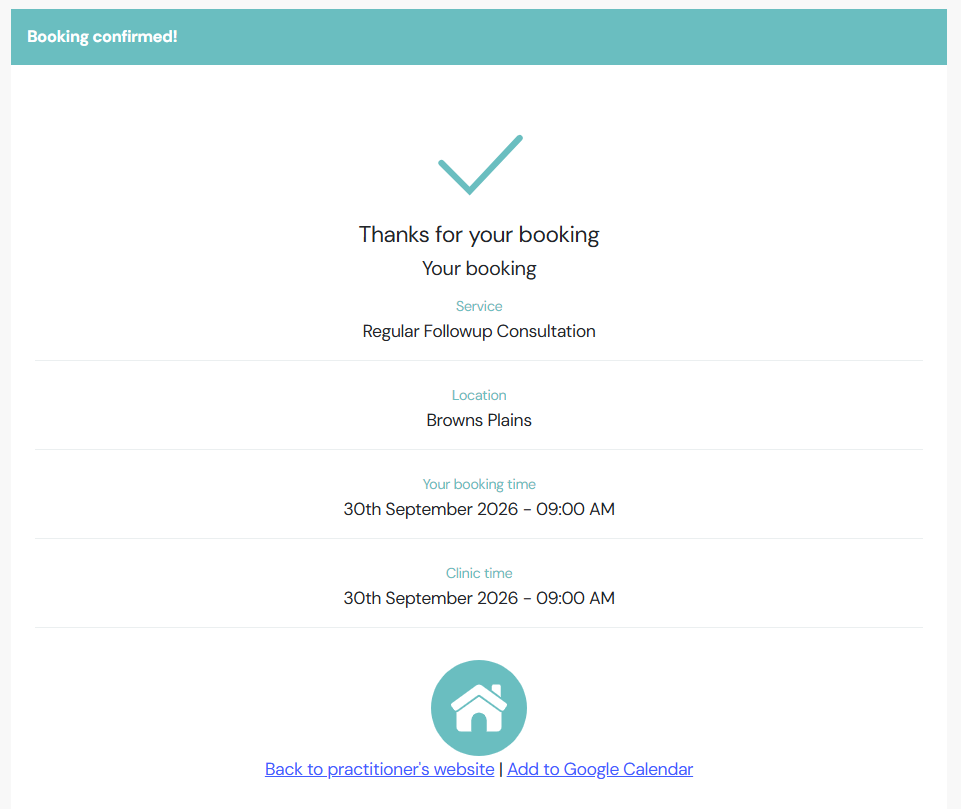
Each month, once the subscription payment has been successful the patient can book their entitled consultations via your online booking url.
It's recommended to include your online booking url in your Membership Plan confirmation email as per step 5.
When the patient books in for the correct service through the online booking url, SimpleClinic will recognise they have existing entitlements and payment request will be bypassed.
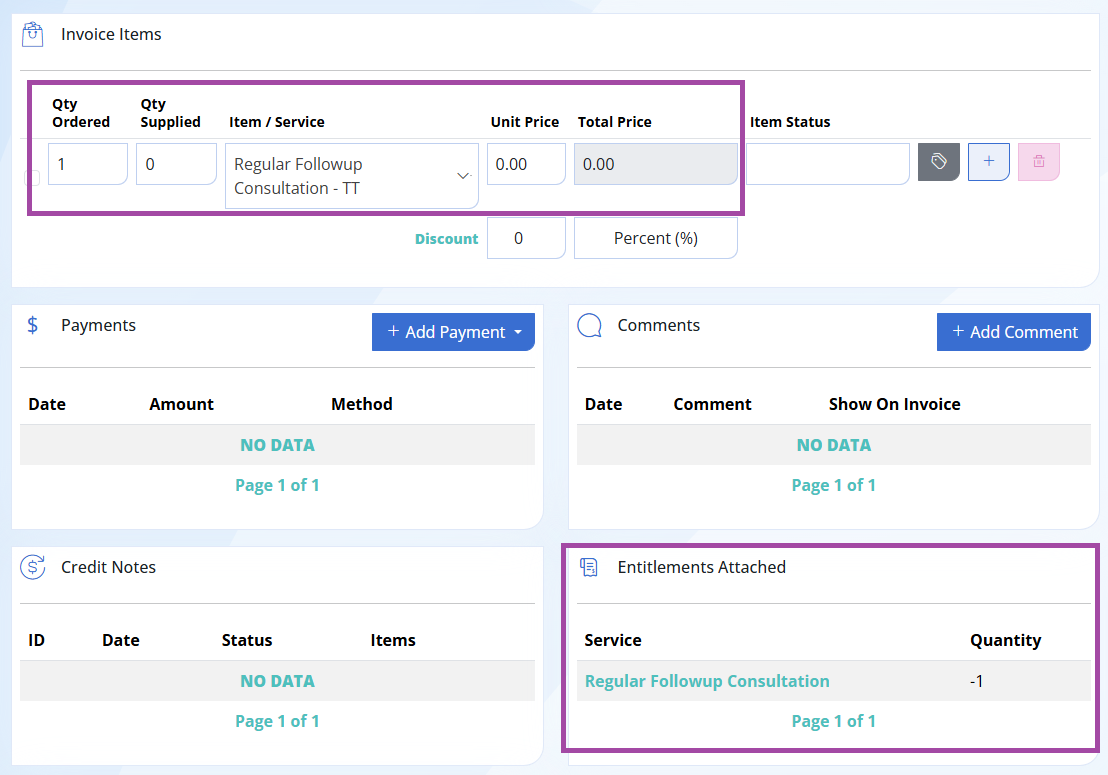
An invoice will be created under the Patient Record -> Finance tab -> showing the service at $0.
Under Entitlements Attached -> the service will show as Quantity -1, indicating the invoice is paid using the membership entitlement.
Provide an invoice for claiming Private Health
Step 11.
To create an invoice for the patient to claim their consultation with their private health fund:
- Go to the patient record -> open the $0 invoice
- Edit the unit price to what they paid for this service (the accurate proportion of the membership price, not the full price of the service)
- Add a payment to the invoice
- Open the link to view the invoice
- Select download and save a PDF of the invoice
- Email the PDF to the patient
- Hide the invoice so that it doesn’t affect income reporting. You can add a comment to explain why it was created and hidden.
Cancel a Membership Plan
Step 12.
To cancel a patients Membership Plan including all future payments and entitlements go to Billing Schedules in the left hand Main Menu --> View the Patients Billing Schedule.
Unselect 'ACTIVE' --> then click 'Delete Schedule.'
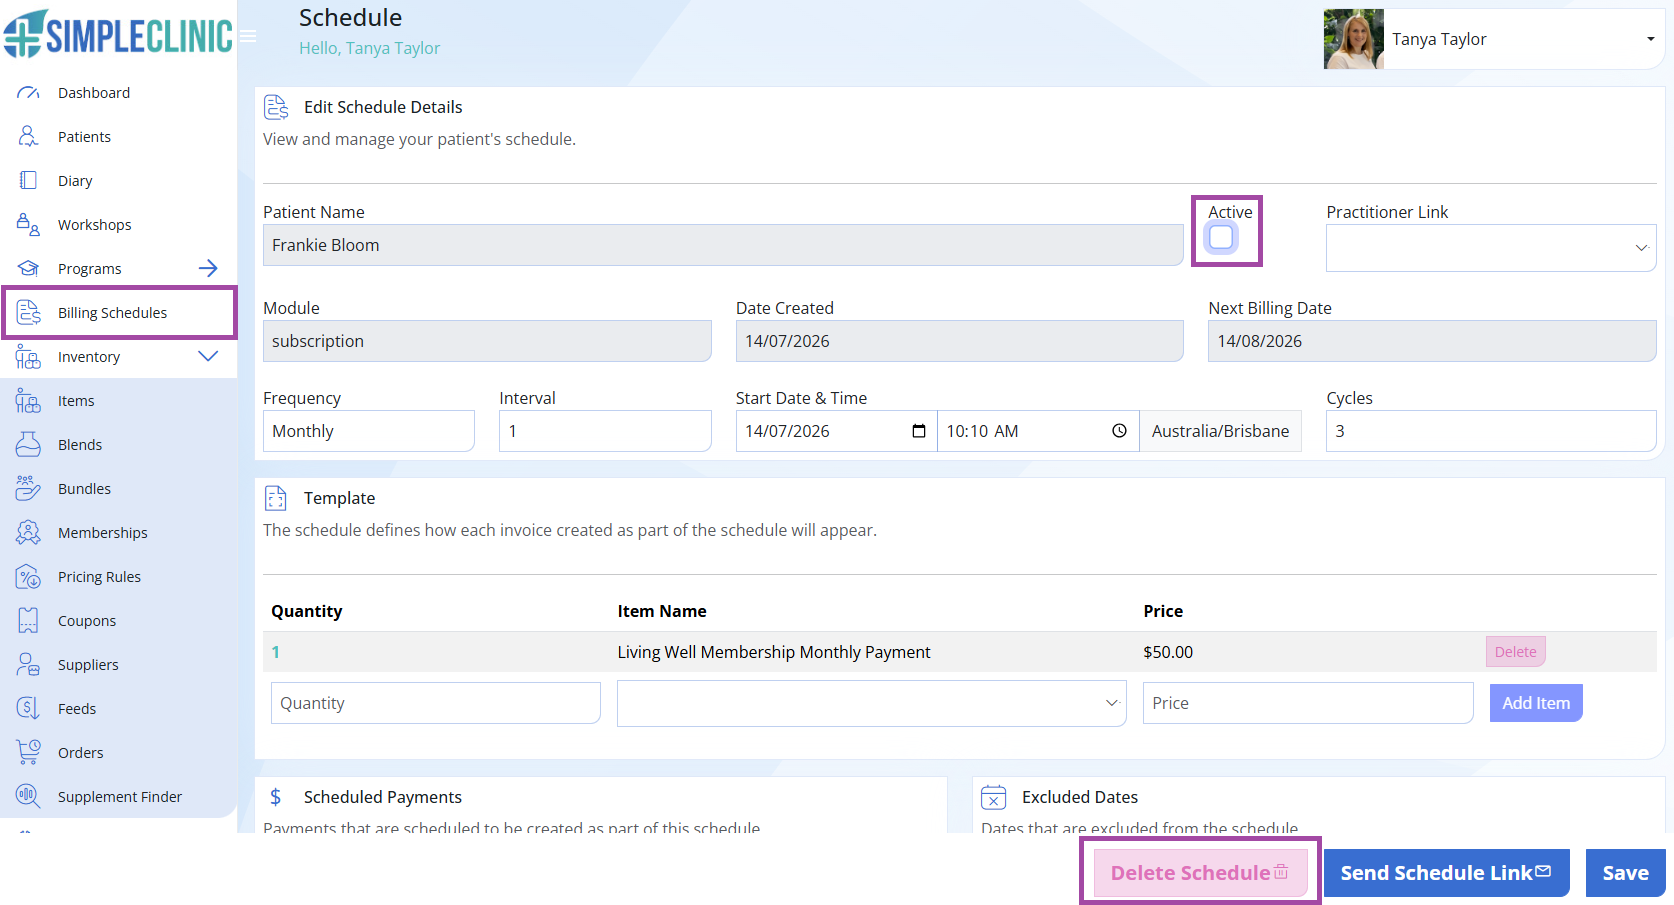
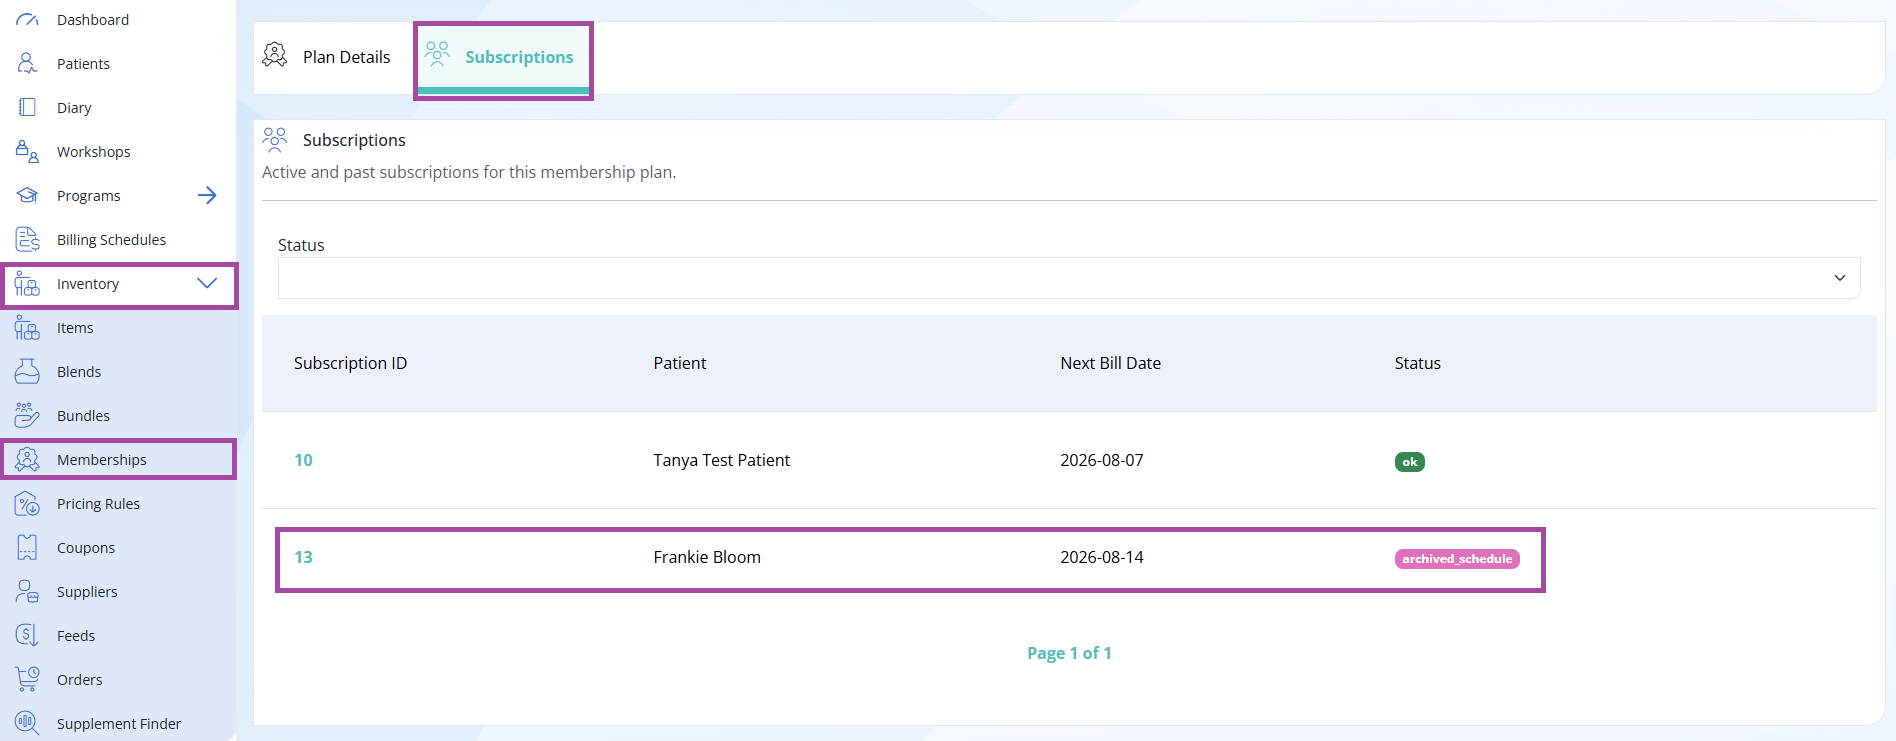
Once the Billing Schedule has been deleted, the Subscription will display as an 'Archived_schedule' under your Membership Plan subscription list.
Go to Inventory --> Memberships --> View your Membership Plan --> Select the Subscriptions Tab.
Step 13. Remove Program Enrollment
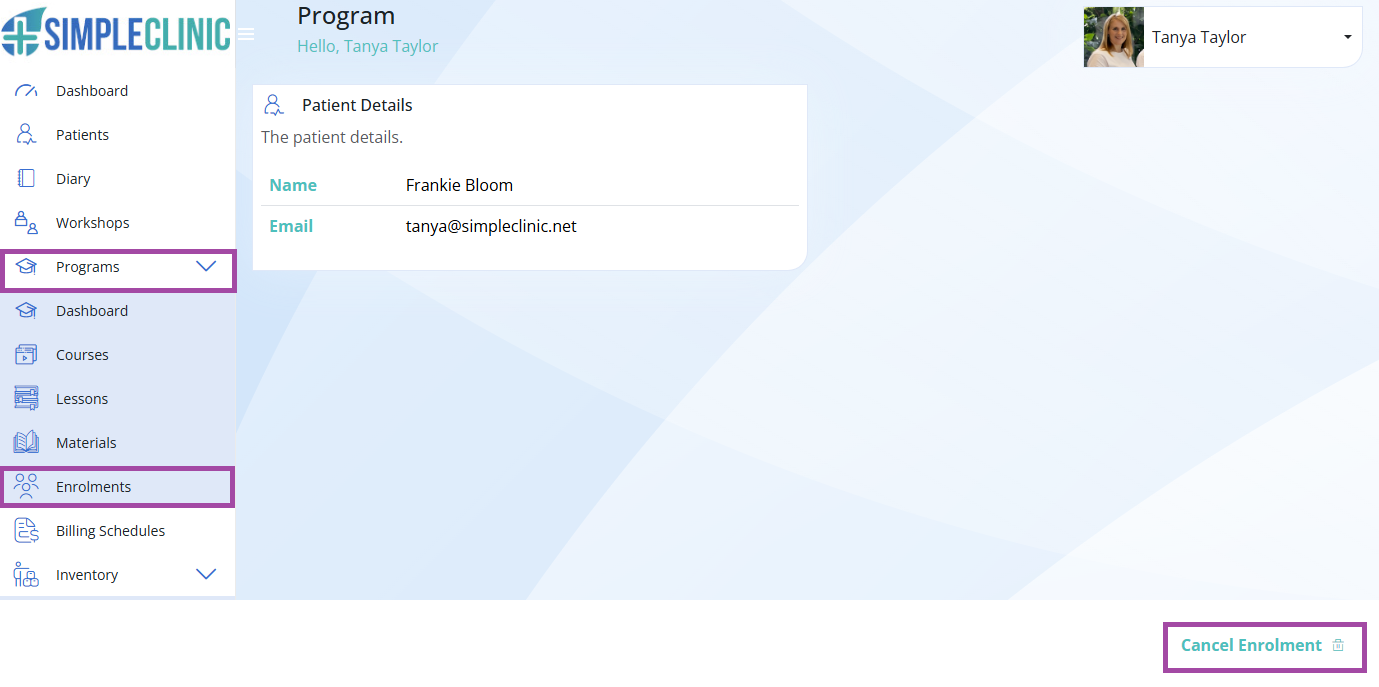
If your patient has access to a Program via their Membership Plan and you wish to revoke this access, go to Programs --> Enrolments -> Cancel Enrolment.
Failed payments notifications
If a payment fails due to insufficient funds you will see a notification appear under Notifications on the Main Menu.
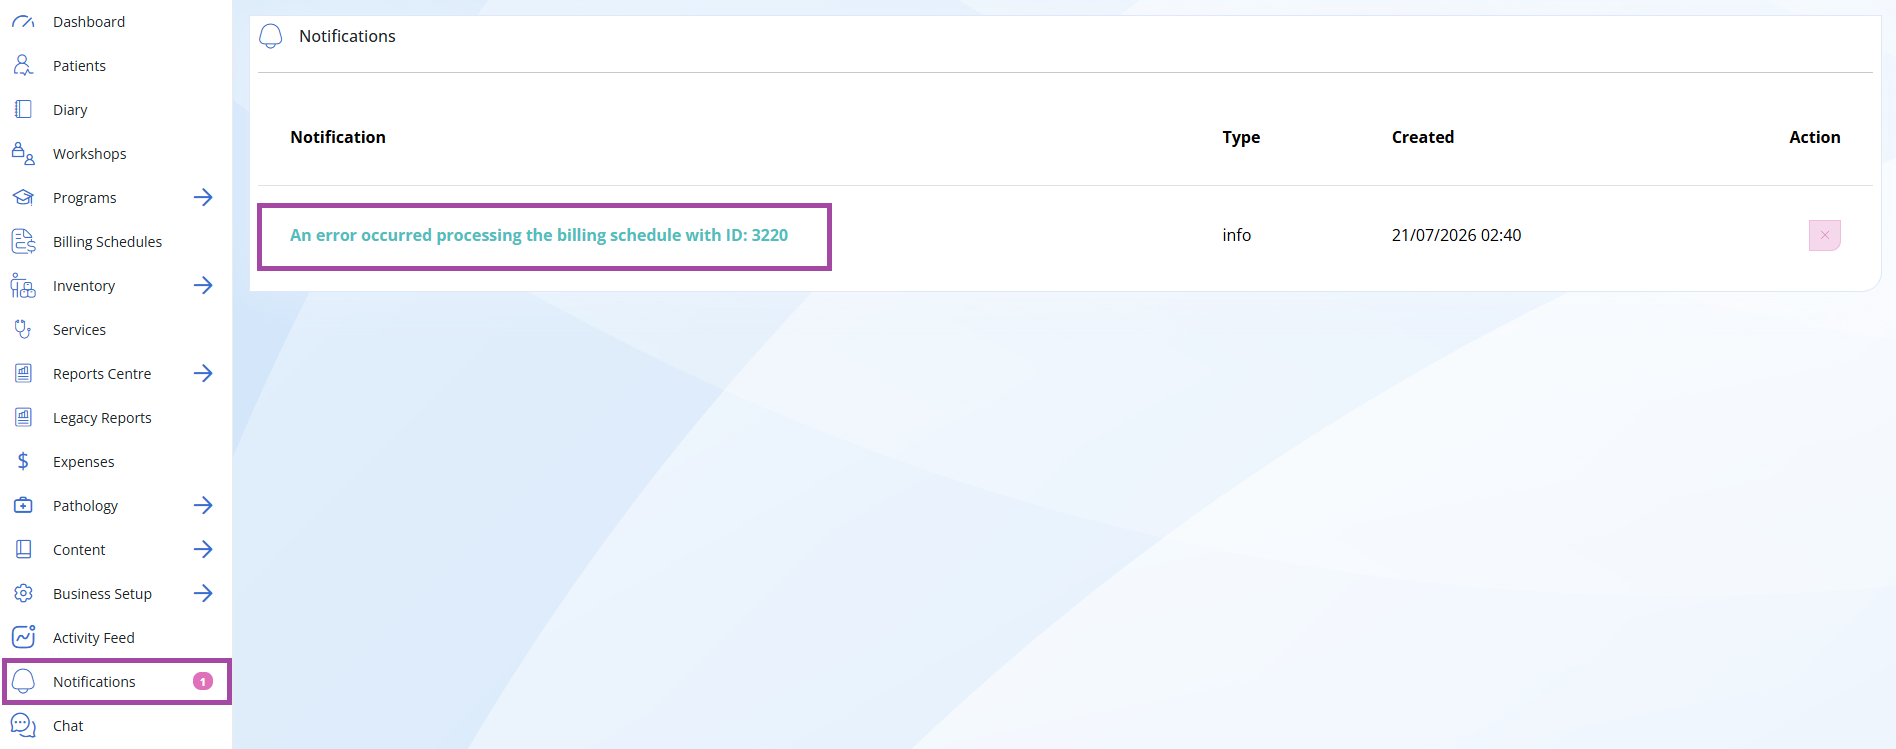
You can view the unpaid invoice by going to 'Outstanding Invoices' at the bottom of your Dashboard or under the patient record --> Finances tab.
Taking Payment
You can then either manually attempt to make payment on the patients card by opening the invoice --> selecting the + payments button --> select the patients card details as the payment method. Or you can email the invoice to the patient to make payment with another method/card.
Troubleshooting
If the patient is asked for payment when attempting to book their entitled service check the following
- Check your patient is booking the correct service they are entitled to.
- Check the patients billing has occurred for the month, releasing their next entitled services